Filler use, also known as verbal filler or linguistic pause, refers to the habitual and often unconscious repetition of words or phrases by individuals, usually to buy time for thought, anxiety, nervousness, or social awkwardness. This behavior is more prevalent in certain groups, such as those with Asperger’s syndrome, autism spectrum disorder, or other neurodevelopmental disorders.
Verbal fillers can be categorized into two main types: aural and articulatory. Aural fillers are sounds that individuals make while speaking, without forming words, such as “um,” “ah,” or “uh.” Articulatory fillers, on the other hand, involve the actual formation of words, like “like,” “you know,” or “so.”
Some common verbal cues of filler use include: repeated use of “like” or “um” in a single sentence; hesitation before starting to speak; prolonging words by adding unnecessary sounds (“y-y-yes”) or syllables (“uh-huh”); and frequently asking for clarification or repetition, such as “can you repeat that?” or “what was that?.”
Other signs of filler use may include: awkward pauses between sentences; using non-sequiturs or tangents to buy time; speaking in a drawling or slow manner; and exhibiting an unusual pattern of intonation or stress on words.
Contact Us
It’s Me and You Clinic – Anti-Wrinkle, Dermal Filler and Skincare Clinic, Kingston, Surrey
Kingston upon Thames, Surrey, United KingdomKT2 6LX
Filler use can be a sensitive issue, as individuals who exhibit this behavior might feel self-conscious or embarrassed about it. However, recognizing the signs of filler use can help individuals with autism, Asperger’s syndrome, or other conditions communicate more effectively and build confidence in their social interactions.
A person may also use verbal fillers when they are thinking deeply, processing complex information, or experiencing high levels of stress or anxiety. In these cases, the filler is not necessarily a result of nervousness, but rather a coping mechanism to manage the emotional intensity of the moment.
Interestingly, some researchers suggest that filler use can be a sign of intelligence, creativity, or analytical thinking. For instance, individuals who exhibit high levels of verbal fillers might be processing information more deeply and considering multiple perspectives before responding.
Moreover, filler use can vary across cultures and languages. While certain verbal cues like “um” or “ah” are more prevalent in Western cultures, other regions may employ different filler words or sounds. Understanding these cultural variations is essential for effective communication and avoiding misunderstandings.
To recognize the signs of filler use, it’s helpful to pay attention to an individual’s speech patterns over time. By analyzing their verbal behavior in different contexts and conversations, you can better understand whether they are using fillers as a habitual trait or simply due to nervousness or anxiety.
Avoidance behavior and lack of eye contact may also be indicative of excessive filler use, as individuals who struggle with verbal communication often exhibit these behaviors when attempting to communicate.
Prolonged pauses between sentences or during conversations can be a significant indicator of filler use. When someone is hesitant to speak or struggles to find the right words, they might pause for an extended period, sometimes filled with awkward silence or filler words like “um” or “ah.”
The way a person uses nonverbal cues such as hand gestures, body language, and facial expressions can also reveal excessive filler use. Individuals who are fidgeting, avoid eye contact, or exhibit other nonverbal signs of discomfort may be using fillers to stall for time.
Pay attention to the words themselves, too. Fillers like “like,” “you know,” and “um” might be used excessively in certain contexts or situations. For instance, if someone is using these words repeatedly throughout a conversation, it could indicate filler use.
Certain phrases or expressions that signal discomfort or hesitation can also be indicative of filler use. Phrases like “So, uh, what were we talking about?” or “Let me think for a second” might be used to buy time and avoid verbal communication.
Additionally, the speaker’s tone, pitch, and volume can be revealing. A person who is struggling with filler use might speak in a higher-pitched or softer voice than usual, or they might use more volume control to compensate for their hesitation.
Avoid interrupting others when they exhibit filler behavior, as this can create an uncomfortable atmosphere. Instead, listen attentively and try to understand the context of the conversation.
Recognizing filler use in someone who speaks with you regularly can be challenging, but paying attention to these signs can help you address the issue constructively. If you’re concerned about your own verbal communication habits, consider seeking feedback from others or practicing public speaking to improve your skills.
Excessive filler use can be a sign of anxiety, nervousness, or insecurity, so it’s essential to approach the situation with empathy and understanding. By being aware of these signs and adapting your communication style accordingly, you can create a more supportive and encouraging environment for others.
Cultivating a growth mindset and being open to constructive feedback are essential in addressing filler use. By acknowledging the issue and making an effort to improve your verbal communication skills, you can reduce your reliance on fillers and become a more effective communicator.
Filling in gaps and pausing to choose the right words can be an effective way for some people to convey that they are thinking carefully about their next sentence. However, when this becomes a habitual pattern, it can become a noticeable feature of their speech.
One of the most common signs of filler use is the frequent use of words like *_um_*, *_ah_*, or *_you know_* in conversations.
Research suggests that people with Speech Disorders, such as Autism Spectrum Disorder (ASD) or Stuttering, may overuse these words due to difficulties with speech fluency and language processing (American Speech-Language-Hearing Association, n.d.).
In order to recognize the signs of filler use, it’s essential to pay attention to the frequency and context in which these words are used. Do they seem to be inserted into conversations randomly, or do they tend to appear when the person is struggling to find the right words?
Another sign of filler use is pause prolongation, where a speaker takes an unusually long time to respond to a question or complete their sentence.
Pauses and hesitations can also be indicative of filler use, as individuals may pause to gather their thoughts before responding or to choose the right words.
Additionally, people who use fillers may exhibit verbal tics, such as blinking, fidgeting, or touching their face, which can be distracting and affect the listener’s ability to follow the conversation.
A person’s tone of voice can also reveal their level of filler use. Do they tend to speak in a slower, more deliberate pace, or do they rush through their words?
Finally, paying attention to how fillers impact the conversation as a whole is crucial. Do fillers become a regular feature of the person’s speech, making it difficult for others to follow or understand them?
Self-awareness and sensitivity to audience are key factors in recognizing filler use, as individuals who are aware of their own filler habits can take steps to reduce their frequency and improve the flow of their speech.
Filling Gaps in Communication
Filling gaps in communication and lack of nonverbal cues are common behaviors exhibited by individuals who use **filler words**, such as “um,” “ah,” “like,” or “you know.”
These verbal tics can be a giveaway that someone is struggling to communicate effectively, often due to anxiety, nervousness, or insecurity.
OBSERVING A LACK OF NONVERBAL COMMUNICATION IS CRUCIAL IN DETECTING FILLER WORDS. Nonverbal cues such as body language, facial expressions, and tone of voice can reveal a person’s emotional state and level of comfort in the conversation.
Individuals who frequently use fillers may appear **nervous**, **anxious**, or **intimidated**, causing them to mask their true emotions through verbal substitutes.
Avoiding eye contact, fidgeting with objects, or displaying closed-off body language can be indicative of a person’s discomfort and anxiety in the conversation, leading them to resort to fillers as a coping mechanism.
Additionally, **pausing excessively** or struggling to articulate thoughts and ideas can also suggest that someone is using fillers to mask their nervousness.
The lack of nonverbal cues can make it challenging for others to pick up on the person’s emotional state, leading them to misinterpret their intentions or respond inappropriately.
By paying attention to nonverbal signals, you can gain a deeper understanding of someone’s emotions and **intentional vs. unintentional communication**.
Noticing inconsistencies between verbal and nonverbal cues can also indicate that someone is using fillers to hide their true feelings or intentions.
In such cases, it’s essential to approach the conversation with empathy and understanding, rather than taking the person’s words at face value.
By recognizing the signs of filler words and lack of nonverbal cues, you can create a more supportive and open communication environment, where individuals feel comfortable sharing their thoughts and feelings.
Filling gaps in communication and disorganized speech patterns are common indicators that a person may be using filler words or sounds excessively. Filler words, also known as verbal tic, are small words or sounds used to pause or continue speaking in order to avoid uncomfortable silences or to buy time to gather thoughts.
A person’s speech can become disorganized when they rely heavily on fillers, resulting in abrupt changes in tone, pitch, or volume. This can be particularly noticeable when the speaker is trying to convey a message but struggles to articulate their thoughts clearly. Disorganized speech patterns may include stuttering, hesitating, or using filler words like “um,” “ah,” “you know,” or “like” repeatedly.
Fillers can be used in various ways to fill gaps in communication. Some common examples of fillers include:
“Um” or “uh” – often used as a pause between sentences
“Ah” or “oh” – sometimes used to soften the tone of a sentence
“You know” or “I mean” – used to transition between ideas or to soften the impact of a statement
“Like” or “sort of” – used to indicate a vague or uncertain meaning
“Ahh” or “eh” – often used as a filler when speaking quickly or under pressure
Disorganized speech patterns can be caused by various factors, including:
– Anxiety or stress: When someone is nervous or anxious about the conversation, they may resort to fillers and disorganized speech patterns as a coping mechanism.
– Inexperience with public speaking: Individuals who are new to public speaking may struggle to articulate their thoughts clearly and use fillers excessively.
– Learning disabilities: Certain learning disabilities, such as stuttering or apraxia, can affect an individual’s ability to speak fluently and lead to disorganized speech patterns.
Identifying someone with disorganized speech patterns requires attention to their verbal behavior, tone, pitch, and volume. Some common signs include:
“Umm” or “uhh” sounds repeated excessively
Abrupt changes in tone, pitch, or volume during the conversation
“Pausing” for an extended period between sentences or phrases
Using filler words as a transition to another thought or sentence
A tendency to “talk around” the point being discussed
It is essential to approach individuals with disorganized speech patterns in a supportive and non-judgmental manner. By understanding the underlying causes of their behavior, you can help them build confidence in their communication skills.
Some strategies for dealing with fillers and disorganized speech include:
Speaking clearly and slowly to give the person time to gather thoughts
Encouraging active listening by maintaining eye contact and asking clarifying questions
Praising effort, rather than fluency or eloquence, when speaking
Providing opportunities for practice in a low-stakes environment
Using positive reinforcement to promote confidence and self-assurance
By recognizing the signs of disorganized speech patterns and using supportive strategies, you can help individuals overcome their fillers and communicate more effectively.
Assessing Filler Use in Different Contexts
The ability to assess filler use in different contexts is crucial in evaluating an individual’s communication style.
Filler use, also known as verbal fillers or speech disfluencies, refers to the non-essential sounds or words used by speakers to pause between sentences or during pauses in conversation. These can include words like “um,” “ah,” “you know,” or “like.”
When evaluating someone’s communication style, it’s essential to consider whether their filler use is excessive, which may indicate nervousness, anxiety, or lack of confidence.
In some contexts, such as in a professional setting or when speaking with authority figures, filler use can be seen as a red flag. For instance, if an individual consistently uses fillers like “uh” or “um” during presentations or meetings, it may suggest that they are struggling to articulate their thoughts or lack experience in communicating effectively.
However, in other contexts, such as casual conversations with friends or family, filler use can be a more nuanced issue. In these settings, excessive filler use might indicate nervousness or discomfort, but it’s not necessarily a sign of poor communication skills.
It’s also worth noting that certain individuals may have higher levels of filler use due to cultural or socio-economic factors. For example, studies have shown that individuals from lower socioeconomic backgrounds tend to use more fillers in their speech than those from higher socioeconomic backgrounds.
The context in which the filler use is occurring is also critical in evaluation. For instance, during a job interview, excessive filler use may be seen as a negative trait, while in a social setting with friends, it might be viewed as endearing or relatable.
Additionally, an individual’s self-awareness and ability to manage their filler use can be indicative of their communication style. If someone is aware of their filler use and makes a conscious effort to reduce it, it may suggest that they value effective communication and are willing to adapt their behavior accordingly.
Furthermore, filler use can also be influenced by an individual’s cultural background or language proficiency. For example, some languages have more fillers than others, and non-native speakers may be more likely to exhibit filler use due to language barriers.
To accurately assess filler use in different contexts, it’s essential to consider multiple factors beyond just the frequency of filler use. This includes observing an individual’s overall communication style, including their verbal and non-verbal cues, body language, and tone of voice.
It’s also important to keep in mind that filler use can be a complex issue with many underlying causes. Rather than simply judging someone’s communication style based on their filler use, it’s essential to approach the evaluation with empathy and understanding.
A nuanced understanding of filler use in different contexts requires a deep knowledge of human communication and a willingness to consider multiple perspectives. By taking a comprehensive approach to evaluating filler use, you can gain a more accurate understanding of an individual’s communication style and its underlying strengths and weaknesses.
Filler use refers to the habitual repetition of certain sounds, such as “um” or “ah,” that individuals use when speaking in order to fill pauses in their speech. However, filler use can be a symptom of an underlying anxiety disorder, and it is not necessarily indicative of poor communication skills or lack of intelligence.
In assessing filler use, it is essential to consider the context in which someone uses fillers. For example, individuals with anxiety disorders may be more likely to use fillers in situations where they feel nervous, such as during job interviews or when meeting new people (National Institute of Mental Health, n.d.). On the other hand, people who are simply not aware of their filler use or are unaware of how to eliminate it may use fillers in everyday conversations.
The type and frequency of filler use can also provide insight into a person’s communication style. For example:
Frequent use of verbal fillers such as “um” or “ah” may indicate a lack of confidence or anxiety in speaking.
Using filler words in situations where they are not necessary, such as during a job interview, may suggest a lack of preparation or awareness of one’s communication style.
Filler use that is habitual and automatic can be more indicative of an underlying anxiety disorder rather than poor communication skills.
Additionally, cultural background and language acquisition can also influence filler use. For example:
In some cultures, using fillers such as “um” or “ah” is a common way to indicate polite hesitation.
Individuals who are non-native English speakers may be more likely to use verbal fillers due to language barriers or difficulties with pronunciation.
When assessing filler use, it is also essential to consider the context in which they are used. For example:
Filler use in formal situations such as job interviews or academic presentations may be more indicative of anxiety than poor communication skills.
Filler use during casual conversations with close friends and family members may be less noticeable and less indicative of underlying issues.
In conclusion, assessing filler use requires consideration of the context in which they are used. By taking into account factors such as anxiety disorders, cultural background, language acquisition, and the type and frequency of filler use, individuals can gain a more accurate understanding of whether someone’s filler use is indicative of poor communication skills or an underlying anxiety disorder.
It is also worth noting that filler use can be eliminated with practice, awareness, and training. Individuals who are aware of their filler use and make an effort to eliminate it may improve their communication skills and reduce feelings of anxiety in social situations.
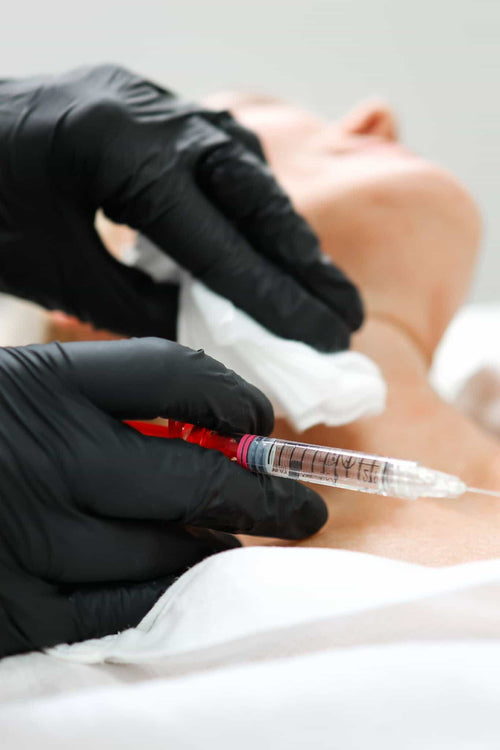
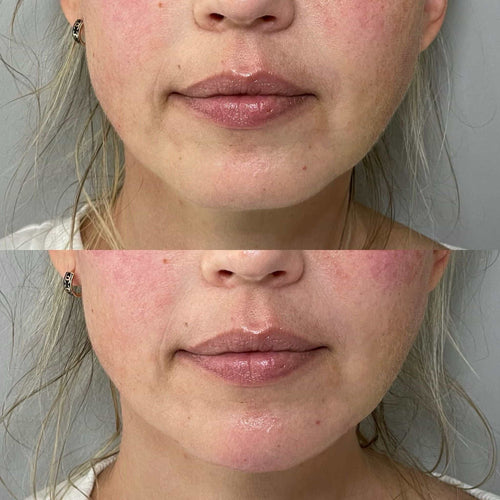
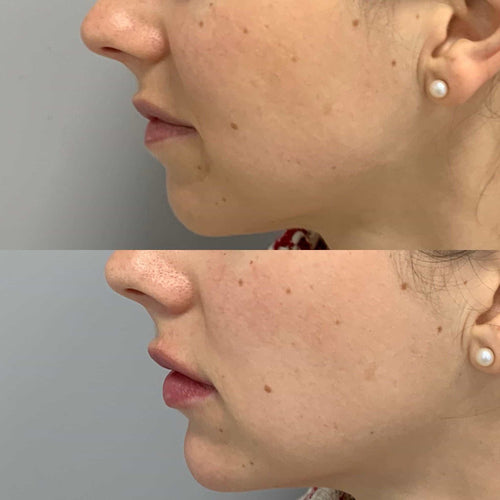
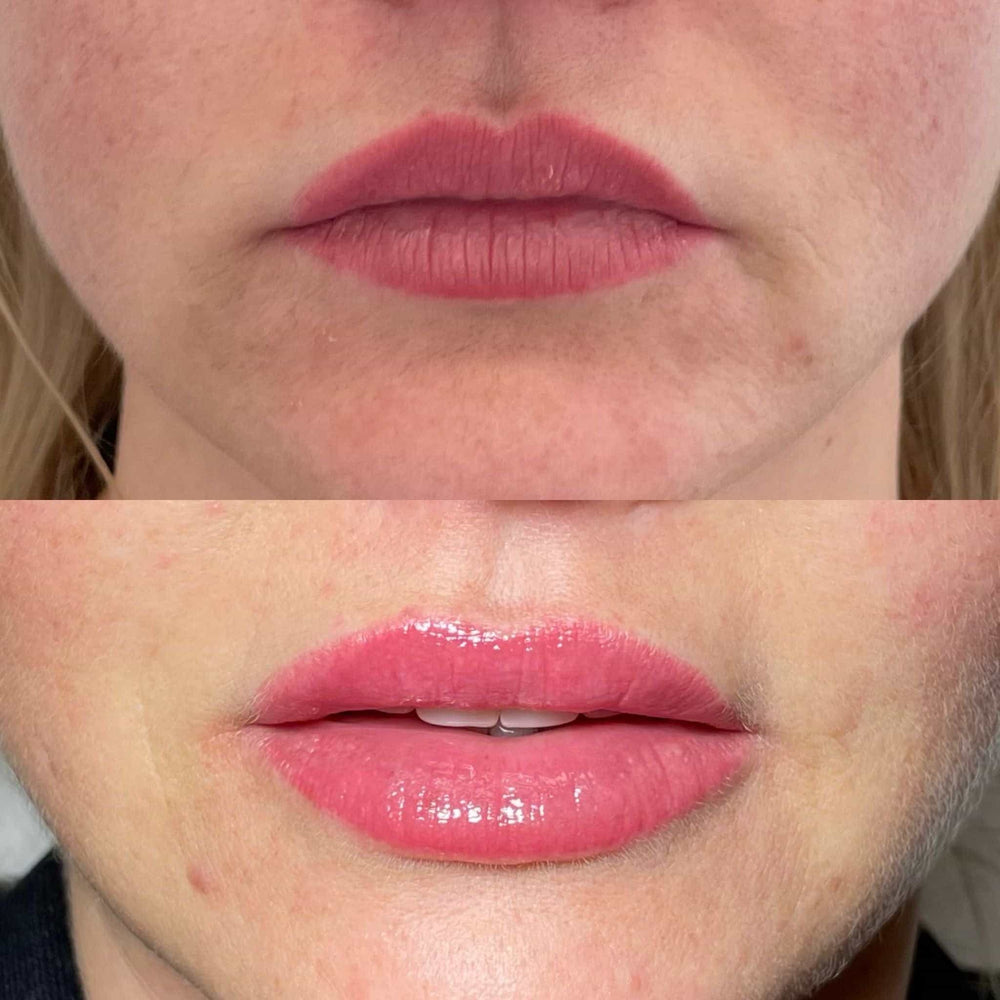
To perform a tear trough filler with a cannula, it’s essential to understand the anatomy of the area and the procedure involved.
The tear troughs, also known as the nasolabial folds or hollows under the eyes, are a common area for concern among individuals looking for non-surgical facial rejuvenation options. The tear trough filler is designed to address these concerns by filling in the hollow areas with a hyaluronic acid-based gel.
The procedure typically begins with thorough preparation of the skin and surrounding area. This includes cleaning and numbing the area with a topical anesthetic cream or ice pack to minimize discomfort during the procedure.
Next, the cannula is inserted through a small incision in the corner of the mouth or above the eyebrow, depending on the individual’s anatomy and personal preference. The cannula is then gently advanced under the skin to access the tear trough area.
The cannula is used to deposit the filler material into the hollow areas under the eyes, following the natural contours of the face. This requires a great deal of skill and experience, as the cannula must be maneuvered carefully to avoid overfilling or puncturing the orbital fat.
Once the filler material has been deposited, the cannula is removed, and the area is massaged gently to distribute the filler evenly and minimize any swelling or bruising.
The entire procedure typically takes around 15-30 minutes to complete, depending on the number of areas being treated and the individual’s response to the filler material. It’s essential to choose an experienced practitioner who has performed numerous cannula tear trough fillers to achieve optimal results.
During the recovery period, which can last anywhere from a few hours to a few days, it’s not uncommon for individuals to experience some swelling, bruising, or sensitivity in the treated area. These side effects are usually mild and temporary, but they can be minimized by following post-procedure instructions carefully.
It’s also essential to note that while cannula tear trough fillers offer a safe and effective way to address concerns in this area, they may not provide as much permanence or satisfaction as more invasive surgical procedures. However, for many individuals, the results achieved through cannula tear trough fillers are still incredibly satisfying and long-lasting.
Regular maintenance treatments may be necessary to maintain the desired level of correction and prevent the re-emergence of the hollow areas under the eyes. The frequency of these treatments will depend on individual factors, such as skin texture, age, and lifestyle, but they can typically be spaced 6-12 months apart.
In addition to addressing concerns in the tear trough area, cannula fillers can also be used to enhance other facial features, such as the lips, cheeks, or jawline. With proper training and experience, practitioners can use these minimally invasive techniques to create a more balanced and youthful appearance for their clients.
Preparation is Key
When it comes to performing a tear trough filler with cannula, preparation is crucial for achieving optimal results and minimizing potential complications.
The first step in preparing for this procedure is to thoroughly research the procedure and understand what to expect. This includes learning about the different types of fillers that can be used, their respective effects, and any potential side effects or risks involved.
It’s also essential to choose a qualified and experienced medical professional who has the necessary training and expertise in administering tear trough fillers using cannulas. A qualified practitioner will be able to assess your individual needs and provide personalized guidance throughout the process.
To ensure a safe and successful procedure, it’s vital to follow a strict pre-procedure checklist. This should include avoiding certain medications, such as blood thinners, in the days leading up to the procedure, as well as refraining from consuming heavy meals or caffeine on the day of the treatment.
It’s also crucial to maintain good skin health by maintaining a consistent skincare routine, using sunscreen daily, and getting adequate sleep and hydration. This will help to ensure that your skin is in optimal condition for the procedure and reduce the risk of complications.
A thorough consultation with your practitioner is also essential before undergoing a tear trough filler with cannula. During this discussion, you can discuss your expectations, address any concerns or questions you may have, and determine the best course of treatment for your individual needs.
Additionally, it’s vital to understand that tear trough fillers are not suitable for everyone. Certain medical conditions, such as high blood pressure or autoimmune disorders, may increase your risk of complications or interact with other medications. Your practitioner will be able to advise you on any potential risks and whether this procedure is safe for you.
Once you’ve been cleared for treatment, it’s essential to prepare your skin for the procedure. This includes cleaning and numbing the area around the tear troughs using a topical anesthetic cream or ice packs. In some cases, your practitioner may also use a special cleansing solution to clean the skin thoroughly before injecting the filler.
Finally, during the actual procedure, your practitioner will carefully administer the filler using a cannula, taking care to avoid any blood vessels or nerve endings. They will work in small increments, allowing you to adjust and communicate any concerns or discomfort throughout the process.
After the procedure, it’s essential to follow proper aftercare instructions to ensure optimal healing and minimize potential complications. This includes applying cold compresses to reduce swelling, avoiding strenuous activities for a few days, and following your practitioner’s advice on pain management and follow-up appointments.
By following these steps and taking a thorough approach to preparation, you can significantly improve the chances of achieving successful results from your tear trough filler with cannula treatment. Remember to carefully research, consult with a qualified practitioner, and prioritize your skin health before undergoing this procedure.
Hyaluronic acid, commonly used in _tear trough fillers_, such as *_Restylane_* and *_Juvederm_*, has been extensively tested for its safety and efficacy in cosmetic procedures.
As a naturally occurring substance in our bodies, hyaluronic acid is well-tolerated and has proven to be an effective solution for addressing _tear troughs_.
The American Society for Dermatologic Surgery (ASDS) has reported that hyaluronic acid fillers are preferred due to their ability to provide *_immediate results_* without causing significant side effects.
This is particularly advantageous when it comes to _tear trough filler with cannula_ procedures, where the goal is to achieve a natural-looking and long-lasting result with minimal downtime.
When preparing for a _tear trough filler with cannula_, it’s essential to choose the right material. Hyaluronic acid fillers are often preferred due to their biocompatibility, ease of use, and proven safety record.
A thorough understanding of the procedure, including the selection of the right product and proper technique, is crucial for achieving optimal results with a _tear trough filler with cannula_.
The most common side effects associated with hyaluronic acid fillers are mild and temporary, such as redness, swelling, or bruising. However, these effects usually resolve on their own within a few days.
It’s also worth noting that there are other types of materials used for _tear trough fillers_, including calcium hydroxylapatite and poly-L-lactic acid. While they have their own benefits and drawbacks, hyaluronic acid remains the most popular choice due to its versatility and efficacy.
To ensure a successful outcome with a _tear trough filler with cannula_, it’s essential to follow pre- and post-procedure instructions carefully. This includes avoiding strenuous activities, applying cold compresses to reduce swelling, and attending follow-up appointments as scheduled.
Precise _preparation_ is essential when performing a **tear trough filler with cannula** procedure, as it sets the foundation for a successful outcome.
A thorough understanding of the patient’s _anatomical_ characteristics, medical history, and _allergic tendencies_ is crucial in selecting the most suitable filler material and technique. This information will also help determine the optimal cannula size and needle depth to minimize the risk of complications.
The skin preparation stage involves _cleansing_ and _sterilizing_ the treatment area to prevent any infection or adverse reactions. A _thin layer_ of lubricant may be applied to reduce friction between the cannula and skin, allowing for smoother insertion and reduced discomfort for the patient.
It is essential to assess the patient’s _skin elasticity_ and _firmness_ before commencing treatment. This will enable you to choose the most suitable filler material that suits their individual skin type and needs.
The cannula should be carefully sterilized between patients, and a new, unused cannula should be used for each _suture line_. Improperly used or reused cannulas can lead to _infection_, _scarring_, or other complications.
A sterile drap and gowning procedure will also need to be followed during the treatment. This ensures that the area remains clean and free from any contamination, reducing the risk of infection or adverse reactions.
The area around the eye is particularly delicate and requires extra attention when preparing it for filler treatment. A gentle, _soothing_ cleanser should be used to cleanse the skin, followed by a series of gentle, _massaging strokes_ to help break down any _adhesions_ or _scar tissue_.
Appropriate lighting is also essential in this stage, as it will enable you to visualize the area more clearly and assess the patient’s individual needs. A high-intensity light source can be particularly helpful when performing fillers with cannula procedures.
A thorough understanding of the filler material’s _composition_ and _properties_ is necessary to ensure that it is selected for optimal results and minimal complications. Regular maintenance, storage, and handling of the filler material will also play a crucial role in minimizing risks associated with the procedure.
Determining the effectiveness and longevity of a tear trough filler procedure largely depends on various factors, including skin health.
A well-nourished and healthy lifestyle plays a vital role in achieving optimal results after undergoing this cosmetic treatment.
Maintaining a balanced diet rich in essential nutrients, fruits, vegetables, and whole grains can help improve the overall condition of your skin, making it more receptive to treatments.
Regular exercise not only boosts collagen production but also enhances circulation, which is crucial for the proper absorption and distribution of fillers.
Adequate hydration is also essential; drinking plenty of water helps to flush toxins out of your body and keeps your skin hydrated from within.
Protecting your skin from the harsh effects of the sun by using a broad-spectrum sunscreen with at least SPF 30 is vital, especially after undergoing a tear trough filler procedure.
Avoiding smoking or excessive alcohol consumption can significantly improve the overall condition of your skin and promote faster healing after treatments.
Additionally, it’s recommended to avoid getting laser treatments or chemical peels before undergoing injectables as these procedures can temporarily or permanently alter the skin texture and tone, leading to unpredictable results with fillers.
The University of California, Los Angeles (UCLA) dermatology department emphasizes the importance of avoiding these pre-treatment interventions to ensure a safe and effective outcome.
Furthermore, maintaining realistic expectations and understanding the limitations and potential side effects of tear trough fillers is essential for achieving optimal results.
It’s also crucial to choose an experienced and qualified healthcare professional or dermatologist with extensive experience in administering tear trough fillers to minimize risks and ensure a successful outcome.
By prioritizing your skin health and taking the necessary steps to prepare, you can maximize the effectiveness of your tear trough filler procedure and enjoy optimal results for a longer period.
The Procedure Itself
The procedure itself begins with the preparation of the treatment area, which involves cleaning and disinfecting the skin to prevent any infection or adverse reaction.
A topical anesthetic may be applied to numb the area, although this is not always necessary.
The cannula, a small hollow tube filled with filler material, is then inserted into the tear trough area using a sharp instrument called a cannula holder.
The cannula is gently manipulated under the skin, and the filler material is slowly injected in a controlled manner to avoid any lumps or unevenness.
As the filler material is being injected, it’s essential to work in small increments, allowing each layer to settle before adding more, this helps to maintain even distribution and prevent over-filling.
The injector will carefully observe the area through a mirror or a device called a “tear trough camera” which provides a magnified view of the treated area.
Once the desired amount of filler has been injected, the cannula is withdrawn, and any excess material is gently pressed out from under the skin using a specialized instrument.
The treated area may be massaged gently to help distribute the filler evenly and reduce any bruising or swelling.
A post-procedure assessment will be conducted to evaluate the effectiveness of the treatment and ensure that the desired results have been achieved.
Throughout the procedure, it’s essential for the injector to maintain good communication with the client, explaining what they are doing and answering any questions they may have.
The entire procedure should take approximately 30-60 minutes, depending on the extent of the treatment and the number of cannulas used.
After the treatment is complete, the client should rest for a short period to allow their body to absorb the filler material and minimize any potential side effects.
It’s essential to note that tear trough fillers are considered a minimally invasive procedure, but as with any injectable treatment, there may be some temporary side effects such as bruising, swelling, or redness in the treated area.
In most cases, these side effects resolve on their own within a few days, but it’s crucial to follow the post-procedure instructions provided by the injector to ensure optimal healing and minimize the risk of complications.
The procedure for injecting filler material into the tear trough area using a cannula involves several key steps and considerations to ensure safety and efficacy.
The first step is to prepare the treatment area, which typically begins with the application of local anesthesia to minimize discomfort and pain during the procedure.
This can be achieved through the use of lidocaine or other topical anesthetics, as recommended by the American Osteopathic College of Dermatology, in accordance with established guidelines.
With the area numbed, the cannula is then inserted into the tear trough area, which is the hollow space beneath the lower eyelid.
The filler material is chosen for its compatibility with the skin and its ability to provide a natural-looking augmentation of the area.
The filler material is injected into the tear trough area using the cannula, typically from one end of the nasolabial fold to the other, in a gentle, sweeping motion.
This motion helps to distribute the filler material evenly and prevent lumps or irregularities from forming under the skin.
The amount of filler material injected will depend on the individual’s needs and the extent of the tear trough area that requires augmentation.
It is essential to follow a predetermined plan for injecting the filler material to ensure uniform distribution and optimal results.
Contact Us
It’s Me and You Clinic – Anti-Wrinkle, Dermal Filler and Skincare Clinic, Kingston, Surrey
Kingston upon Thames, Surrey, United KingdomKT2 6LX
The cannula is moved slowly and carefully along the tear trough area, with gentle pressure applied to minimize the risk of complications or bleeding.
During the procedure, the clinician should closely monitor the patient’s response and adjust their technique accordingly to achieve the desired outcome.
A thorough discussion with the patient about the potential benefits and risks associated with the procedure, as well as aftercare instructions, is also crucial for a successful treatment.
Additionally, patients should be advised on how to manage any potential swelling or bruising that may occur in the treated area.
The entire process typically takes between 15-60 minutes to complete, depending on the complexity of the procedure and the individual’s needs.
Following the procedure, patients can return to their normal activities immediately, but they should avoid strenuous exercise or heavy lifting for a few days.
A follow-up appointment may be scheduled several weeks later to assess the final results and make any necessary adjustments to the filler material.
The procedure itself typically involves a series of steps that help ensure a safe and effective treatment. The primary focus is on injecting fillers into the tear trough area, which can be achieved through various techniques.
Preparation: The treatment room is set up with necessary equipment, including a sterile environment, and the patient is instructed on how to prepare for the procedure. This may include avoiding blood-thinning medications, fasting from food and drink, and refraining from tanning or waxing.
Marking the Area: A topical anesthetic cream or injectable is applied to numb the area, ensuring minimal discomfort during the procedure. The tear trough area is marked with a pen to serve as a reference point for the injector.
Cannula Insertion: The cannula, a small needle attached to a syringe, is inserted into the mark at a 45-degree angle under the skin. This allows the filler material to be deposited precisely beneath the surface without causing excessive trauma.
Filler Injection: The filler material is then injected through the cannula in a slow and controlled manner, starting from the deepest point of the tear trough and working its way up towards the surface. Gentle pressure is applied to ensure even distribution of the filler.
Blunting and Refinement: After initial filling, the injector uses a blunt instrument, such as a cannula tip or a special tool, to smooth out any irregularities and refine the results. This step is crucial for creating a more natural appearance.
Cannula Removal: Once the desired fillers have been injected, the cannula is carefully removed, and any necessary sutures or stitches are placed if required.
Throughout the procedure, monitoring for reactions is of paramount importance. Signs of an adverse reaction can include:
Unintended migration of the filler material beyond its intended area of deposit
A thorough post-procedure assessment will help identify any potential complications and ensure that the patient is satisfied with the results.
The procedure itself involves the administration of a *_filler material_* into the tear trough area, which requires close monitoring of the patient’s reaction to ensure a safe and successful outcome.
As the *_ filler material_*, typically an *_autologous fat graft_* or a *_synthetic filler_* such as hyaluronic acid or calcium hydroxylapatite, is administered through a *_cannula_*, it’s crucial to watch for any signs of adverse reaction in the patient.
These signs can include *_swelling_* at the injection site, *_redness_* and *_inflammation_* around the area, or *_pain_* that may radiate from the tear trough to the surrounding facial structures.
The *_FDA_* recommends that healthcare professionals be aware of potential complications associated with *_tear trough fillers_* and report any *_adverse events_* to their regulatory authority.
This includes but is not limited to, *_allergic reactions_*, *_infections_*, *_blood clots_*, *_scarring_*, and *_asymmetrical results_*. It’s essential for healthcare professionals to be vigilant in monitoring the patient’s reaction throughout the procedure and to take prompt action if any adverse events occur.
During the procedure, it’s also crucial to maintain proper *_anatomical positioning_* of the face and neck to ensure the *_filler material_* is injected correctly and minimizes the risk of complications.
The *_cannula_* used for the administration of *_filler material_* should be sterilized and maintained in a clean environment to prevent any *_infections_*. The healthcare professional should also follow proper *_disposal procedures_* for any leftover *_filler material_* or equipment.
Additionally, it’s essential for the patient to be educated on the potential risks and complications associated with *_tear trough fillers_* and to understand the importance of proper post-procedure care to minimize the risk of adverse events.
This includes avoiding strenuous activities, avoiding smoking, and keeping the face elevated above the level of the heart to reduce swelling and promote optimal healing.
Aftercare and Results
To ensure optimal results after undergoing a **Tear Trough Filler** procedure using a cannula, it’s essential to follow a comprehensive aftercare plan.
One of the primary concerns following this type of treatment is swelling and bruising. These can be temporary but may cause discomfort and affect the overall appearance of the treated area. To minimize swelling and bruising, it’s crucial to follow your practitioner’s instructions carefully.
Ice packs are a common treatment for reducing swelling. Apply an ice pack wrapped in a cloth to the affected area for 15-20 minutes at a time, several times a day. This will help constrict blood vessels and decrease inflammation.
In the first few days after the procedure, it’s normal to experience some bruising. Topical creams containing peptide, vitamin K, or Arnica may be applied to help reduce bruising and promote healing.
Avoid strenuous activities, such as exercise or heavy lifting, for the remainder of the day after the procedure. This will help minimize the risk of further swelling or bleeding.
It’s also essential to avoid massaging or rubbing the treated area for at least 48 hours after the procedure, as this can dislodge the filler particles and cause further complications.
Following your practitioner’s instructions regarding oral pain medication, you may be prescribed antibiotics to prevent infection. It’s also crucial to attend follow-up appointments to ensure the area is healing properly and to make any necessary adjustments.
It’s essential to remember that results from a **Tear Trough Filler** procedure using a cannula can vary depending on factors such as skin type, filler material used, and individual response. However, with proper care and maintenance, the results can be long-lasting and effective.
To maintain optimal results, it’s recommended to avoid facial expressions that cause strain on the treated area, such as raising your eyebrows or smiling too widely. It’s also crucial to use sunscreen with at least SPF 30 daily to prevent further aging of the skin.
Avoiding smoking and excessive alcohol consumption can also help promote healthy tissue healing and maintain optimal results. By following a comprehensive aftercare plan and attending follow-up appointments, you can ensure the best possible outcomes from your **Tear Trough Filler** procedure using a cannula.
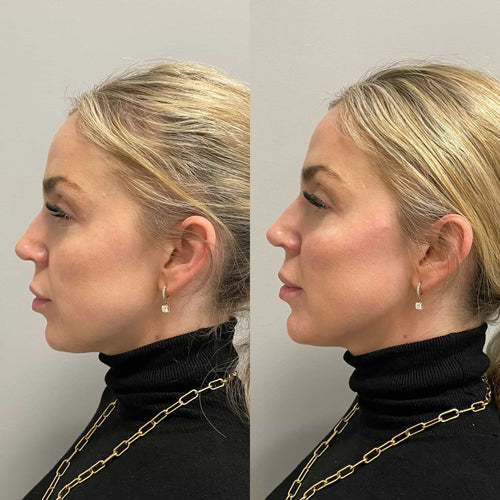
The tear trough filler procedure, also known as a **Canthopexy**, aims to restore a more youthful appearance by filling in the hollows under the eyes, creating a smoother and brighter look.
After undergoing this procedure, patients may experience some side effects that are usually temporary and resolve on their own. The most common side effects include:
Swelling: This is one of the most common side effects, which can be quite noticeable immediately after the procedure. It’s essential to follow post-care instructions to minimize swelling.
Bruising: Similar to swelling, bruising is also a normal occurrence that should resolve within a few days. In some cases, it may persist longer, but it’s usually not severe.
Numbness: This side effect can be quite uncomfortable and may last for several weeks. However, in most cases, numbness subsides on its own, and sensation returns to normal within 1-2 weeks.
Redness: Mild redness around the injection site is a common side effect that usually resolves quickly without any serious complications.
The good news is that these side effects are typically mild and temporary, resolving on their own within **2448 hours**. In some cases, they may persist for several days or up to 2 weeks, but it’s essential to note that most patients experience a significant improvement in appearance during this time.
It’s crucial to follow post-care instructions carefully to minimize the risk of complications and ensure a smooth recovery. This includes:
Resting with your head elevated for a few hours after the procedure
Avoiding strenuous activities, such as exercise or heavy lifting
Applying cold compresses to reduce swelling and bruising
Avoiding rubbing or massaging the treatment area
The results of a tear trough filler procedure can be long-lasting, with some patients experiencing significant improvement in appearance for up to 12 months. Factors that influence the longevity of results include:
Individual metabolism and skin type
Quality of the filler material used
Proper post-care instructions followed
Diet and lifestyle habits, such as sun exposure and smoking
To maintain optimal results, it’s essential to:
Follow proper pre- and post-care instructions
Maintain a healthy lifestyle, including a balanced diet and regular exercise
Avoid excessive sun exposure and use sunscreen to protect the skin
Consider touch-ups or maintenance treatments to maintain optimal results
Aftercare and Results
After undergoing a tear trough filler procedure using a cannula, it’s essential to follow a comprehensive aftercare routine to ensure optimal results and minimize potential complications. During the initial recovery period, your skin may be sensitive, swollen, or bruised, which can last from a few hours to several days. To promote healing, swelling reduction, and improved appearance, adhere to the following guidelines:
*
Rest your face for the remainder of the day to reduce swelling and allow the filler material to settle.
Apply cold compresses or ice packs wrapped in a cloth to cool the area and minimize bruising. Repeat this process for 5-10 minutes at a time, with breaks in between, until the discomfort subsides.
Avoid strenuous activities, such as heavy exercise, bending, or lifting, which can cause swelling or dislodge the filler material.
Keep your head elevated while sleeping to reduce swelling and promote fluid drainage. Use an extra pillow or two to support your neck and face.
Avoid rubbing, massaging, or touching the treated area until it has fully healed.
Use gentle, fragrance-free cleansers and avoid harsh skincare products that may irritate the skin.
Maintain a healthy lifestyle by staying hydrated, eating well-balanced foods, and getting sufficient sleep.
Results
The results of a tear trough filler procedure using a cannula can vary depending on individual factors, such as skin type, facial structure, and the amount of filler material used. Generally, patients can expect to see noticeable improvements in:
*
Reduced appearance of fine lines and wrinkles under the eyes.
More defined cheekbones and a more youthful facial profile.
A brighter, more radiant complexion.
The filler material used for tear troughs typically lasts between 6-18 months, depending on factors such as:
*
Skincare habits and lifestyle choices.
Metabolic rate and overall health.
The quality of the filler material used.
To maintain optimal results, it’s recommended to schedule follow-up appointments with your doctor for regular touch-ups and assessments. This will help ensure that the filler material is still effective and that any potential side effects are addressed promptly.
Touch-ups and Maintenance
To extend the lifespan of your tear trough fillers and maintain optimal results, it’s essential to commit to a routine maintenance program:
*
Immediate Touch-ups
Schedule follow-up appointments with your doctor 2-3 weeks after treatment for initial assessments and touch-ups.
Regular Maintenance
Come in for regular check-ups every 6-12 months to assess the filler material’s longevity and address any potential side effects.
Maintain good skincare habits, including sun protection, hydration, and a balanced diet.
Avoid excessive sun exposure, heavy lifting, or strenuous activities that can cause swelling or bruising.
Long-term Care
Consider incorporating anti-aging treatments, such as chemical peels or microdermabrasion, into your skincare routine to maintain a smooth, youthful complexion.
Stay committed to healthy lifestyle habits, including regular exercise and balanced eating, to support overall skin health and well-being.
By following these guidelines and committing to regular maintenance, you can enjoy optimal results from your tear trough filler procedure and maintain a radiant, youthful appearance for years to come.
To maintain the desired results after undergoing a tear trough filler procedure using a cannula, it’s essential to follow up with your healthcare provider for touchups or maintenance injections.
The American Academy of Facial Plastic and Reconstructive Surgery (AAFPRS) recommends that patients return for a complimentary consultation six weeks after their initial procedure to assess the longevity of the fillers.
During this follow-up appointment, your healthcare provider will evaluate the effectiveness of the fillers and determine if additional touchups are needed to maintain the desired results.
The frequency of follow-up appointments may vary depending on individual factors such as:
The type and amount of filler used in the procedure
The patient’s skin type and condition
The location and depth of the tear trough area
The patient’s lifestyle habits, such as sun exposure, smoking, and facial expressions
Average follow-up appointments may be necessary to maintain optimal results, typically ranging from every 3-6 months.
During these appointments, your healthcare provider may use various techniques to refresh or touch up the fillers, including:
Re-injection of fillers to maintain volume and fullness
Use of a cannula to gently remove excess filler material
Application of topical treatments or creams to enhance skin texture and appearance
The benefits of following up with your healthcare provider after a tear trough filler procedure include:
Preservation of the desired results
Prevention of complications, such as lumps, swelling, or asymmetry
Enhanced skin texture and appearance
Personalized guidance on maintaining optimal results between appointments
A well-planned follow-up schedule with your healthcare provider will help you maintain the natural, refreshed look you desire, ensuring that the effects of the tear trough filler procedure last for an extended period.
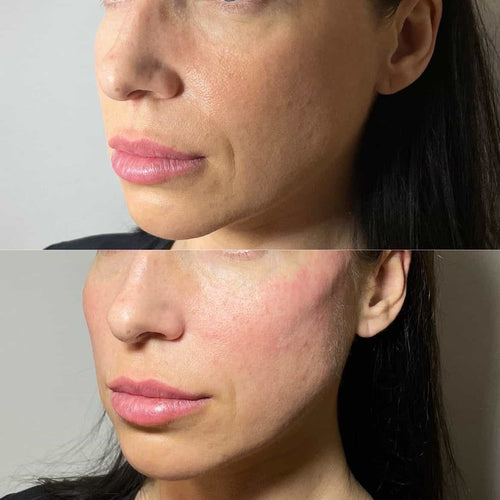
Determining individual needs for facial fillers, like those used in cheeks, requires a comprehensive assessment that goes beyond a simple volume calculation. Facial structure plays a crucial role in this process.
Here’s a breakdown of how facial structure influences filler requirements:
Facial Symmetry:
Each face is unique, with slight asymmetries that contribute to its character. Assessing these asymmetries helps determine if one cheek needs more filler than the other to achieve balance.
Bone Structure:**
The underlying bone structure of the cheeks, including the zygomatic arches and the maxilla (upper jaw), significantly impacts filler placement and volume. A high cheekbone structure might require less filler, while a flatter cheekbone structure may benefit from more.
Soft Tissue Volume:**
The amount of natural fat and muscle in the cheeks influences how much filler is needed to achieve desired results. Some individuals have naturally fuller cheeks, requiring less augmentation, while others may have thinner cheeks and require more filler to create volume.
Skin Elasticity:
The elasticity and laxity of the skin affect how fillers are distributed and maintained. Younger, tighter skin retains filler better, requiring potentially fewer touch-ups. As skin loses elasticity with age, more filler might be needed to achieve the desired effect.
Contact Us
It’s Me and You Clinic – Anti-Wrinkle, Dermal Filler and Skincare Clinic, Kingston, Surrey
Kingston upon Thames, Surrey, United KingdomKT2 6LX
Additional Considerations:**
The individual’s aesthetic goals play a crucial role in determining filler volume. Some individuals may desire subtle enhancements, while others may aim for a more dramatic transformation.
A qualified injector will consider all these factors during a consultation to develop a personalized treatment plan that meets the individual’s specific needs and expectations.
Desired Volume Increase
Determining individual needs and desired volume increase for dermal fillers like cheek augmentation requires a comprehensive assessment by a qualified and experienced medical professional.
Here’s a breakdown of the factors involved:
Facial Anatomy and Symmetry: Each person’s face is unique, with varying bone structure, fat distribution, and muscle development. A thorough examination helps determine the desired level of cheek projection and balance.
Desired Outcome: Patients should clearly articulate their goals. Do they want subtle enhancement, a more sculpted appearance, or restoration of lost volume due to aging?
Skin Type and Thickness: Thicker skin may require more filler than thinner skin to achieve the same result.
Injection Technique and Filler Type: The skill of the injector and the chosen dermal filler product influence how much filler is needed and the longevity of the results.
Regarding your question, “Is half ml cheek filler enough?”, there’s no single answer. It depends entirely on the individual factors listed above.
A consultation with a board-certified plastic surgeon or dermatologist specializing in dermal fillers is essential to:
Receive a personalized assessment of your needs and expectations
Discuss various filler options and their suitability for you
Understand the potential risks and benefits associated with the procedure
Determine the appropriate volume of filler to achieve your desired outcome safely and effectively
Remember, choosing a qualified and experienced injector is crucial for achieving natural-looking results and minimizing complications.
Consultation with a Practitioner
Determining individual needs when it comes to dermal fillers like cheek augmentation is crucial for achieving natural-looking and satisfying results. A multitude of factors contribute to this determination, encompassing facial anatomy, personal goals, and desired outcomes.
Facial anatomy plays a pivotal role. Cheekbone prominence, fat distribution, and existing volume all influence how much filler is needed. Individuals with naturally high cheekbones may require less filler than those with more hollowed cheeks. Similarly, the amount of fat present in the face can affect the final result.
Personal goals and desired outcomes are equally important. Some individuals may seek subtle enhancement for a refreshed appearance, while others desire a more dramatic change. Open communication with the practitioner about your expectations is essential to ensure they understand your vision.
Consultation with a qualified aesthetic practitioner is paramount in this process. During the consultation, the practitioner will meticulously examine your facial structure, discuss your goals, and assess your skin type and health. This allows them to recommend the appropriate amount of filler, injection technique, and product type tailored to your individual needs.
Remember that “enough” is subjective and varies greatly from person to person. What might be considered sufficient for one individual may not be suitable for another. A qualified practitioner will guide you through the process, ensuring a personalized approach that maximizes your aesthetic potential while maintaining natural-looking results.
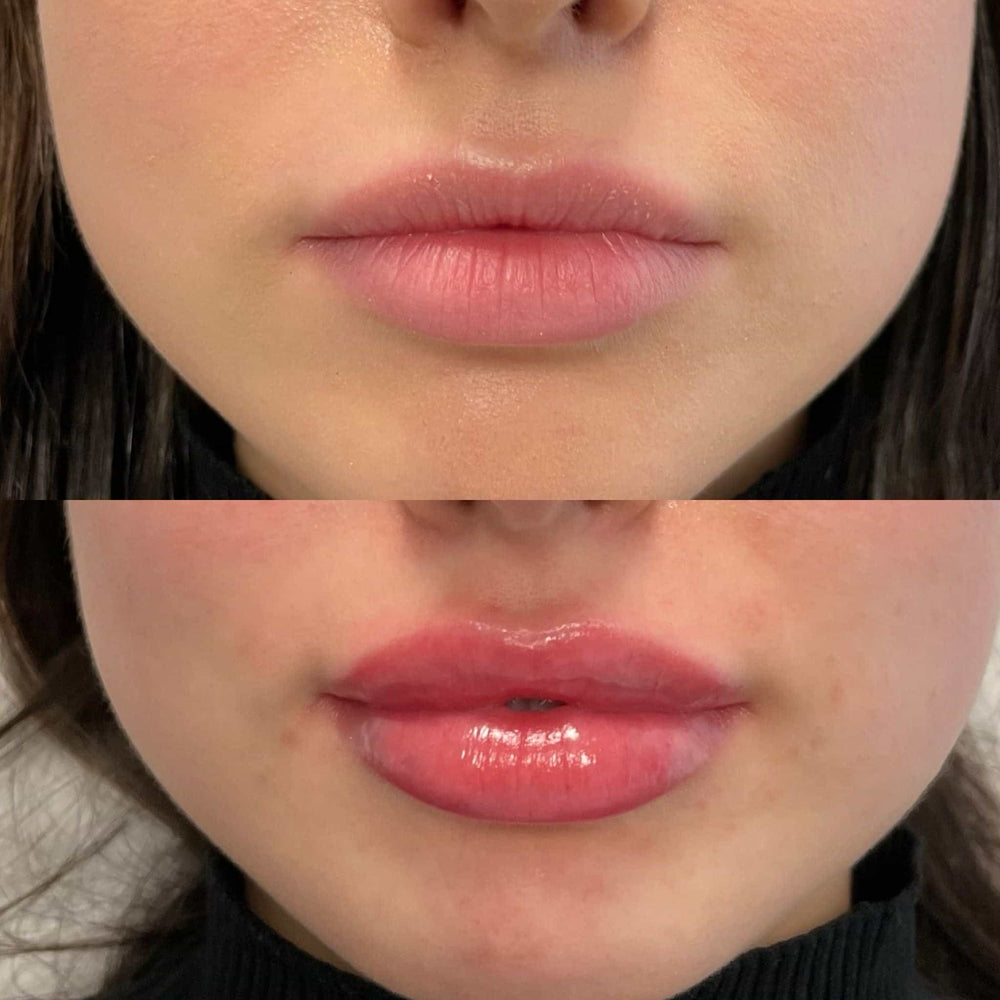
Expected Results with 0.5ml of Filler
Subtle Enhancements
0.5ml of dermal filler is a relatively small volume, often used for subtle enhancements rather than dramatic transformations.
Expected results with 0.5ml of filler in the cheeks will vary depending on individual factors like facial structure, desired outcome, and the specific type of filler used.
Generally, expect to see a gentle lift and subtle plumpness along the cheekbones and mid-face.
It might help define the cheek contours slightly, creating a more sculpted appearance without looking overly full.
This amount is unlikely to significantly change the overall shape of your cheeks or add substantial volume.
Keep in mind that results can be further refined with additional treatments over time, allowing you to gradually achieve your desired look.
If you’re unsure about whether 0.5ml is sufficient for your goals, consult a qualified and experienced injector who can assess your facial features and recommend the best course of action.
When considering a 0.5mL injection of dermal filler for addressing mild deficiencies in the cheeks, it’s essential to understand that results will be subtle and gradual.
This amount of filler is typically used for minor augmentation or contouring, not for dramatic transformations. The desired outcome depends on individual factors like facial structure, skin elasticity, and the specific type of filler used.
Potential enhancements with 0.5mL might include:
• Subtle cheek lifting and definition,
• Reduction of minor hollows or depressions,
• Enhancement of facial symmetry.
It’s crucial to remember that individual results vary greatly. Some people may see noticeable improvements with this amount, while others may require more filler to achieve their desired look.
Consultation with a qualified and experienced injector is paramount. They will assess your unique features, discuss realistic expectations, and determine if 0.5mL is sufficient or if a larger volume is needed.
Furthermore, the type of filler chosen plays a crucial role in achieving desired results. Different fillers have varying textures, consistencies, and longevity. The injector can recommend a suitable option based on your skin type, desired outcome, and budget.
Maintaining realistic expectations and understanding that multiple treatments might be necessary to achieve optimal results is key to a positive experience with cheek filler.
Maintaining Natural Appearance
Achieving a natural appearance with facial fillers requires careful consideration and skillful injection technique.
0.5ml of filler can be sufficient to subtly enhance cheek volume in certain individuals, but it’s important to understand the limitations and expectations.
Here’s a breakdown of potential outcomes:
Subtle Enhancement: 0.5 ml may provide a gentle lift to the cheeks, adding definition and subtly filling in minor depressions. This is often ideal for those seeking a natural refresh rather than a dramatic transformation.
Minimal Cheek Volume Increase: In individuals with naturally higher cheekbones or less pronounced hollows, 0.5ml may result in minimal visible volume increase. It’s important to have realistic expectations and understand that this amount is unlikely to produce significant contouring effects.
Complementary Treatment: 0.5ml of filler can be a good starting point for patients who want to explore dermal fillers but are apprehensive about larger volumes. This allows for gradual augmentation and assessment of desired results before proceeding with additional treatments.
Factors influencing the outcome include:
Individual Facial Anatomy: Cheekbone structure, fat distribution, and skin thickness all play a role in how filler will appear.
Filler Type:** Different fillers have varying densities and lifting capabilities. A hyaluronic acid filler designed for cheek augmentation may be more suitable than a thinner filler meant for fine lines.
Injector Skill: An experienced injector can precisely place the filler to achieve natural-looking results, minimizing the risk of lumps or asymmetry.
It’s crucial to consult with a qualified and experienced injector who can assess your individual needs, discuss realistic expectations, and determine the appropriate volume and type of filler for optimal outcomes.
Alternatives and Considerations
Additional Treatment Sessions
The decision of whether 0.5ml of cheek filler is enough depends on a variety of individual factors and desired outcomes. It’s crucial to have a thorough consultation with a qualified and experienced injector to determine the appropriate amount for your specific needs.
Factors influencing the ideal volume include facial anatomy, skin elasticity, current cheek prominence, desired level of enhancement, and personal preferences.
Here are some considerations when evaluating if 0.5ml is sufficient:
• **Initial Consultation:** A comprehensive consultation with a skilled injector is essential. They will assess your facial structure, discuss your goals, and recommend a suitable volume based on their expertise.
• **Realistic Expectations:** Understand that fillers provide subtle to moderate enhancement. Achieving dramatic changes may require more than 0.5ml or a combination of treatments.
• **Individual Anatomy:** Facial features and bone structure vary greatly. What works for one person may not be sufficient for another with different proportions.
• **Desired Outcome:** Clearly communicate your desired outcome to the injector. Do you want subtle volume increase, cheek contouring, or a more sculpted appearance?
• **Skin Elasticity:** The elasticity of your skin can affect filler placement and longevity. Younger skin may stretch more easily, potentially allowing 0.5ml to be sufficient.
• **Multiple Sessions:** If you desire a more pronounced result, additional treatment sessions with further injections may be recommended.
Additional Treatment Sessions:
If 0.5ml is deemed insufficient or you wish to achieve further enhancement, multiple sessions are often used. The injector will assess the progress and recommend appropriate spacing between sessions based on the type of filler and individual healing time.
It’s important to remember that filler results are not immediate. It can take several days to a week for swelling to subside and the final outcome to become apparent.
Other Dermal Fillers
When considering dermal fillers for cheeks, the ideal volume depends on individual goals and facial anatomy. Half a milliliter might be sufficient for subtle enhancement or to address minor hollows, but it may not produce dramatic results.
Alternatives to hyaluronic acid fillers, which are commonly used for cheek augmentation, include poly-L-lactic acid (PLLA) and calcium hydroxylapatite (CaHA). PLLA stimulates collagen production over time, providing a gradual and lasting lift. CaHA offers immediate volume and contouring, similar to hyaluronic acid.
Factors influencing the amount of filler needed include the desired outcome, existing cheek structure, skin laxity, and patient preferences.
It’s important to consult with a qualified and experienced injector who can assess your individual needs and recommend the most appropriate treatment plan.
They will consider your facial symmetry, bone structure, and skin type to determine the optimal filler type, volume, and placement for achieving natural-looking and harmonious results.
Non-Surgical Facial Rejuvenation Techniques
When considering non-surgical facial rejuvenation techniques, it’s essential to explore a range of alternatives and weigh various factors to determine the most suitable approach for individual needs and goals.
Alternatives to cheek fillers include:
* **Botox:** Primarily known for smoothing forehead lines and crow’s feet, Botox can also be used subtly to lift the cheeks by relaxing muscles that pull the skin downward.
However, it doesn’t add volume like fillers.
* **Thread lifts:** These involve inserting dissolvable threads beneath the skin to gently lift and support sagging tissue, including cheek tissues.
They can provide a more sculpted look than Botox but require a skilled practitioner for optimal results.
Microneedling with radiofrequency (RF) or microneedling alone:
These techniques stimulate collagen production, improving skin texture and firmness, which can indirectly enhance cheek definition over time. However, they don’t offer the immediate volume boost of fillers.
Other considerations when deciding on a facial rejuvenation technique include:
**Desired outcome:** Determine what you hope to achieve—volume enhancement, lifting, wrinkle reduction, or overall skin rejuvenation.
**Skin type and concerns:** Different techniques may be more suitable for specific skin types and conditions. For example, individuals with sensitive skin might prefer microneedling over RF.
**Budget:** Costs can vary widely between techniques, so establish your financial limitations.
**Downtime:** Some treatments require more recovery time than others. Factor in your schedule and tolerance for any potential discomfort or bruising.
Consulting with a qualified and experienced injector or dermatologist is crucial for personalized recommendations and realistic expectations. They can assess your individual needs, discuss the pros and cons of various options, and help you make an informed decision about the best non-surgical facial rejuvenation technique for you.
Kingston upon Thames, Surrey, United KingdomKT2 6LX
Determining the appropriate volume of dermal filler for cheek augmentation depends on a complex interplay of factors, primarily centered around individual facial anatomy and desired aesthetic outcomes.
Here’s a breakdown of key considerations:
Facial Anatomy
**Bone Structure:** Cheekbones provide the framework for cheek augmentation. Individuals with naturally prominent cheekbones may require less filler, while those with flatter cheekbones might benefit from a greater volume.
Fat Distribution:** The amount and placement of facial fat pads influence the desired outcome. Some people have naturally fuller cheeks, while others have areas of hollowness that need addressing.
Skin Thickness:** Thicker skin may require more filler to achieve noticeable results compared to thinner skin.
Midface Depth:** The distance between the cheekbones and the lower eyelid plays a role in determining the desired volume. A shorter midface depth often necessitates more filler.
Desired Aesthetic Goals
**Natural Enhancement:** Subtle volumization might be sufficient for clients seeking a refreshed appearance, while others may desire a more dramatic enhancement.
Facial Symmetry:** Achieving balance and harmony across the face is crucial. Filler placement needs to account for any asymmetry.
Age-Related Changes: As we age, cheeks tend to lose volume. The goal might be to restore a youthful contour rather than create an overly filled look.
It’s important to note that this is a complex process requiring a skilled injector with a thorough understanding of facial anatomy and aesthetic principles.
A consultation with a qualified practitioner is essential to determine the appropriate volume of filler and create a personalized treatment plan.
Desired Look
Determining the right amount of dermal filler for cheek augmentation depends on a variety of factors, all working together to achieve the desired aesthetic result.
One key factor is the individual’s anatomy. Cheekbone structure, fat distribution, and existing volume naturally vary from person to person. Someone with naturally prominent cheekbones might require less filler than someone with flatter cheeks.
Another crucial consideration is the desired look. Some individuals seek subtle enhancement for a more refreshed appearance, while others aim for dramatic volume for a sculpted, contoured look. This plays a significant role in determining the amount of filler needed.
The type and formulation of filler chosen also influence volume. Hyaluronic acid fillers, common in cheek augmentation, come in varying viscosities (thicknesses). Thicker gels offer more immediate volume, while thinner gels provide a smoother, more natural-looking lift.
Individual goals and lifestyle also factor into the equation. An active individual might choose a longer-lasting filler to maintain their results, whereas someone seeking subtle enhancement may opt for a shorter-lasting product that requires more frequent touch-ups.
Finally, it’s important to remember that “more is not always better.” Overfilling can result in an unnatural appearance. An experienced injector will carefully assess each individual and recommend the appropriate amount of filler to achieve their desired outcome safely and aesthetically.
Injection Technique
Determining the appropriate volume of dermal filler needed for cheek augmentation is a nuanced process that depends on several factors.
Facial Anatomy plays a crucial role. Individual bone structure, muscle mass, and existing fat distribution all influence the desired outcome and the amount of filler required.
The *target area* also matters. Some patients seek to subtly enhance their cheekbones, while others desire a more dramatic lift or contour.
Desired Results are paramount. A subtle enhancement might require a smaller volume compared to a more sculpted, prominent look.
Filler Type* and Concentration:** Different fillers have varying viscosities and longevity. Hyaluronic acid fillers, for example, come in different formulations suited to specific areas and desired effects. A thicker gel may be used for volumization, while a thinner consistency might be preferable for subtle contouring.
The **skill and experience of the injector** are essential. A skilled practitioner can accurately assess facial anatomy, understand individual patient goals, and inject filler strategically to achieve natural-looking results with minimal product usage.
Strategic placement is key: Injecting filler too superficially can result in a “puffy” appearance, while injecting too deeply can lead to asymmetry or migration of the filler.
Experienced injectors employ various *techniques*, such as layered injections, fanning, and linear threading, to distribute filler evenly and achieve optimal volume distribution. This allows them to use less product overall while achieving more natural-looking results.
Dermal Filler Types
HA Fillers
Dermal fillers are injectables used to plump up and enhance various facial features. They come in different types, each with unique properties and applications.
**Hyaluronic Acid (HA) Fillers** are the most common type of dermal filler. They work by attracting and holding water molecules, thereby adding volume and hydration to the skin.
HA fillers are generally considered safe and effective. They are reversible, meaning that an enzyme called hyaluronidase can be injected to dissolve them if needed.
There are various brands and formulations of HA fillers available, each with subtle differences in viscosity and longevity.
Some popular HA fillers include Juvederm, Restylane, and Belotero.
When deciding how many dermal fillers you need for your cheeks, several factors come into play:
* **Desired Outcome:** What kind of cheek enhancement are you looking for? A subtle lift, a more defined contour, or a dramatic change?
* **Individual Anatomy:** Cheekbone structure, fat distribution, and skin laxity all influence how fillers will look and last.
* **Filler Type and Volume:** Different HA fillers have varying densities. A less dense filler might require more injections to achieve the desired result.
* **Experience of the Injector:** A skilled injector can assess your unique needs and create a personalized treatment plan using an appropriate number of syringes.
It’s essential to have a consultation with a qualified medical professional, such as a dermatologist or plastic surgeon, to determine the best course of action for cheek augmentation. They will evaluate your individual features, discuss your goals, and advise on the optimal filler type and volume for your desired outcome.
Dermal fillers are injectables made from various gel-like substances that add volume and fullness to different areas of the face, smoothing wrinkles and enhancing contours. Choosing the right type of filler depends on individual needs, desired results, and the area being treated.
There are several types of dermal fillers available, broadly categorized into hyaluronic acid (HA) fillers and non-HA fillers.
Hyaluronic acid fillers, such as Juvederm, Restylane, and Belotero, are the most common type. They are naturally found in the body and attract and hold water, providing hydration and plumping effects. HA fillers come in different formulations with varying viscosities, allowing for diverse applications.
Non-HA fillers include calcium hydroxylapatite (CaHA) fillers, like Radiesse, poly-L-lactic acid (PLLA) fillers, such as Sculptra, and polymethylmethacrylate (PMMA) microspheres, like Bellafill.
Calcium hydroxylapatite (CaHA) fillers are biocompatible synthetic substances that stimulate collagen production, providing long-lasting results.
They work by injecting tiny particles of CaHA into the skin, which gradually degrade over time, prompting the body to produce new collagen. This stimulates structural changes in the underlying tissue, resulting in improved volume and contour definition.
CaHA fillers are often used for moderate to severe facial wrinkles, folds, and volume loss. They are particularly effective in treating areas like the cheeks, jawline, and hands.
Because CaHA fillers stimulate collagen production, their results tend to be more long-lasting compared to HA fillers. While individual responses vary, the effects of CaHA fillers can last for 12 months or longer.
Consultation with a Qualified Professional Assessing Individual Needs
Understanding Risks and Benefits
Consulting with a qualified professional, such as a board-certified plastic surgeon or dermatologist specializing in injectables, is essential before considering any dermal filler treatment, including cheek augmentation.
This initial consultation serves several critical purposes. First, the professional will assess your individual needs and goals. They’ll examine your facial structure, skin quality, and discuss your desired outcome, taking into account your natural features and preferences.
During this assessment, the provider will also thoroughly understand your medical history, including any allergies, medications you’re taking, and past cosmetic procedures. This information is vital to determine if you are a suitable candidate for cheek fillers and to minimize potential risks.
The consultation is also an opportunity to discuss the risks and benefits of dermal fillers in detail.
Potential risks can include bruising, swelling, redness, tenderness, infection, and asymmetry. Some individuals may experience more severe complications like vascular occlusion (blockage of blood vessels), which necessitates immediate medical attention.
Benefits of cheek fillers include facial contouring, restoring volume loss, enhancing cheekbones, creating a more youthful appearance, and boosting overall facial harmony. The provider will explain the expected results based on your unique anatomy and desired outcome.
Furthermore, they’ll address any concerns you have and answer all your questions transparently. Understanding both the potential risks and benefits empowers you to make an informed decision about whether cheek fillers are right for you.
Ultimately, a consultation with a qualified professional is crucial for ensuring safe and effective cheek filler treatment tailored to your individual needs and expectations.
The noticeability of temple fillers hinges on a complex interplay of factors, making it difficult to provide a definitive yes or no answer. Several aspects contribute to whether these treatments will appear obvious.
Contact Us
It’s Me and You Clinic – Anti-Wrinkle, Dermal Filler and Skincare Clinic, Kingston, Surrey
Kingston upon Thames, Surrey, United KingdomKT2 6LX
First and foremost, the type of dermal filler used plays a crucial role. Hyaluronic acid (HA) fillers, like Juvederm and Restylane, are popular choices for temple augmentation. HA is a naturally occurring substance in the body, which makes it generally well-tolerated and less likely to cause visible lumps or bumps.
However, even within the HA category, different formulations exist. Some fillers are specifically designed for volumizing larger areas, while others are finer and more subtle. A skilled injector will choose a filler that matches the individual’s desired outcome and anatomy, minimizing the risk of noticeable results.
The amount of filler injected also significantly influences noticeability. More volume often leads to greater visibility. Subtly enhancing temple contours may be achieved with less product, while achieving more dramatic results requires higher volumes. It’s essential to have realistic expectations and communicate clearly with the injector about the desired level of enhancement.
Individual facial anatomy significantly impacts how fillers appear. Facial structure, bone prominence, skin texture, and muscle movement all contribute to the overall look. Someone with naturally pronounced temples may not require as much filler to achieve their goals, while someone with flatter temples may need more product for noticeable change.
Finally, the skill of the injector is paramount. An experienced practitioner understands facial anatomy, proper injection techniques, and how different fillers behave within the skin. A skilled injector can minimize swelling, bruising, and unevenness, leading to more natural-looking results.
Injection Technique
Several factors influence how noticeable temple filler injections are. The most significant factor is the amount of filler used. Using too much can create an unnatural, bulging appearance that’s easily noticeable. Conversely, using too little may not achieve the desired effect and leave the temples looking flat.
The type of filler chosen also plays a crucial role. Different fillers have varying consistencies and levels of longevity. For example, hyaluronic acid fillers tend to be more natural-looking and easier to blend, making them less noticeable. More permanent fillers like polymethylmethacrylate (PMMA) can sometimes create a more pronounced effect.
The individual’s facial structure and bone anatomy significantly impact the visibility of temple fillers. People with prominent cheekbones or strong jawlines may find that fillers are less noticeable as they blend in more seamlessly. Conversely, those with flatter faces may see a more pronounced change after injection.
The injector’s skill and experience are paramount. A skilled injector can carefully place the filler to create a natural-looking lift without drawing unnecessary attention to the treatment area. They will also take into account individual facial features and desired outcomes.
Other factors that can affect noticeability include skin tone, the presence of wrinkles or other skin imperfections, and post-treatment swelling. Swelling is normal after injections but usually subsides within a few days.
Regarding injection technique, precision is key to achieving natural-looking results. The injector will use specialized needles and cannulas to precisely place the filler in targeted areas beneath the skin. This ensures that the product is evenly distributed and creates a subtle lift without causing visible lumps or bumps.
Minimally invasive techniques, such as cannula placement, are often preferred over traditional needles. Cannulas have a blunt tip, which reduces trauma to surrounding tissues and minimizes bruising and swelling. This can further contribute to more discreet results.
Communication between the patient and injector is essential. The patient should clearly communicate their desired outcome and any concerns about noticeability. The injector should then explain the procedure in detail, including potential side effects and how long it will take for any swelling to subside.
Individual Facial Anatomy
The noticeability of temple fillers hinges on a complex interplay of factors, with individual facial anatomy playing a pivotal role.
**Facial Structure**: A key determinant is the individual’s natural bone structure. People with more prominent temples tend to require less filler to achieve desired augmentation. Conversely, those with shallower temples may need a greater volume of product to create a noticeable difference.
**Filler Type and Placement**: Different types of fillers possess varying densities and viscosities. Hyaluronic acid (HA) fillers are commonly used for temple augmentation due to their ability to seamlessly integrate with the surrounding tissue. The precise placement of the filler is also crucial. Injecting it too superficially can lead to a “bumpiness” effect, while injecting too deeply may not yield the desired lift.
Facial Skin Thickness**: Individuals with thinner skin may find that the results of temple fillers are more noticeable than those with thicker skin. This is because the filler is closer to the surface and more readily visible.
**Muscle Activity**: Facial muscle movements can affect the appearance of fillers. Over time, muscle contractions may cause the filler to shift or diffuse, potentially leading to a less pronounced result.
Age**: As we age, our facial tissues naturally lose volume. This can result in more sunken temples. Temple fillers can help restore youthful contouring and create a more lifted appearance.
**Expectations**: Individual perceptions of what constitutes “noticeable” vary widely. Some people may desire a subtle enhancement, while others seek a more dramatic transformation.
It’s important to consult with a qualified and experienced injector to determine the most appropriate filler type, volume, and placement for your individual anatomy and desired outcome.
Potential Signs of Noticeable Fillers
Overcorrection
While subtle enhancements are often the goal, it’s natural to wonder if temple fillers can be noticeable. Here’s a breakdown of potential signs:
• **Asymmetry:** If one temple appears noticeably fuller than the other, it could signal overcorrection. This can create an unbalanced and unnatural look.
• **Visible Lumps or Ridges:** Improper placement or excessive product injection can lead to bumps or lines that are visible under the skin.
• **Excessive Volume:** If the temples appear excessively enlarged or rounded, it may indicate overfilling. This can make the face look unnatural and disproportionate.
• **Tension or Tightness:** Fillers in the temples can sometimes cause a pulling sensation or tightness in the surrounding skin.
• **Changes in Facial Expressions:** Noticeable changes in how your forehead creases or eyebrows move could suggest that filler placement is affecting natural facial muscle function.
It’s important to note:
1. Individual results vary greatly depending on factors like skin type, the amount of filler used, and the injector’s skill level.
2. If you have concerns about temple fillers being noticeable, it’s crucial to communicate openly with your injector during consultations and follow-up appointments.
3. Consulting a board-certified dermatologist or plastic surgeon who specializes in injectables can help ensure safe and natural-looking results.
Lumps or Bumps
Determining whether temple fillers are noticeable depends on various factors, including the individual’s anatomy, the type and amount of filler used, and the skill of the injector.
Here are some potential signs that temple fillers might be noticeable:
**Overcorrection:** Using too much filler can result in an unnatural or exaggerated appearance. Temples may appear overly plump or “full,” creating a disproportionate look.
Uneven Distribution:
If the filler is not evenly distributed, it can create noticeable lumps or bumps that stand out. This can happen if the injector does not carefully assess and target specific areas of concern.
**Migration:** In some cases, fillers can migrate from the intended injection site to surrounding tissues. This can lead to a bumpy or uneven texture in the temple area.
Visible Contour Lines:
Some types of filler can create visible contour lines, especially if they are not adequately blended with surrounding tissue.
**Loss of Volume Over Time:** Fillers are temporary and will gradually be absorbed by the body. As the filler diminishes, the temples may appear less full or more defined, potentially creating noticeable changes in shape.
Determining whether temple fillers are noticeable depends on various factors, including the amount injected, individual anatomy, and the skill of the injector.
Here are some potential signs that temple fillers might be noticeable:
* **Prominent Swelling or Lumps:** Immediate post-treatment swelling is common, but if it persists for an extended period or creates noticeable lumps or bumps in the temples, it could indicate uneven filler distribution or overcorrection.
* **Asymmetry:** One side appearing more filled or prominent than the other can be a sign of asymmetry. Subtle variations are normal, but significant differences may be noticeable to others.
It is crucial to note that:
* Individual healing times and aesthetic preferences vary greatly. What is considered “noticeable” by one person might not be as apparent to another.
* Experienced injectors will strive for natural-looking results, carefully assessing facial proportions and injecting strategically to minimize the risk of noticeable filler. Get Your Dermal Filler Consultation with Dr. Laura Geige Today
* Open communication with your injector throughout the process is essential. Discuss your concerns and expectations beforehand to ensure you are comfortable with the treatment plan.
Managing Noticeability Concerns
Choosing a Skilled Injector
Managing **noticeability concerns** when considering dermal fillers like Temple Fillers is paramount. Understanding what makes fillers appear noticeable and how to mitigate those risks can help you achieve a more natural-looking result.
Several factors contribute to the potential for *noticeability*:
• **Overcorrection:** Injecting too much filler can create an unnatural, overfilled appearance. This is especially true in areas like the temples, where subtle enhancements are often desired. A skilled injector will assess your facial structure and inject only the amount needed to achieve a harmonious balance.
• **Improper Placement:** Incorrect placement of filler can lead to visible lumps or bumps, compromising the natural contours of your face.
• Filler Choice:** Different types of fillers have varying consistencies. Some are designed for subtle volume enhancement while others provide more dramatic results. A qualified injector will select the appropriate type of filler based on your individual needs and desired outcome.
Choosing a skilled injector is crucial in minimizing noticeability concerns. Look for someone with:
• **Extensive Experience:** Seek an injector who has significant experience working with dermal fillers, particularly in the temple area.
• *Specialized Training:* Look for certifications from reputable organizations such as the American Academy of Facial Plastic and Reconstructive Surgery (AAFPRS).
• Excellent Communication Skills:** A skilled injector will listen carefully to your concerns, discuss your goals, and create a personalized treatment plan.
Prior to your appointment, prepare a list of questions about the procedure, potential risks, and expected outcomes.
Remember that achieving natural-looking results with Temple Fillers requires careful consideration, thorough consultation, and the expertise of a qualified injector.
Realistic Expectations
Managing noticeability concerns when considering temple fillers is a key part of achieving natural-looking results. It’s crucial to remember that every individual’s anatomy and skin texture are unique, influencing how noticeable any dermal filler will be.
Realistic expectations are paramount. Temple fillers aim to subtly enhance volume and create a more balanced facial profile, not dramatically alter your appearance. The goal is to soften the look of recessed temples, improve jawline definition, and achieve a more youthful contour.
Several factors contribute to the visibility of temple fillers:
**1. Amount Injected:** A skilled injector will carefully assess your needs and inject precisely the amount required for subtle enhancement. Overfilling can lead to noticeable lumps or an unnatural appearance.
**2. Filler Type:** Different fillers have varying degrees of viscosity and longevity. Some are more cohesive and designed for deeper injection, while others are lighter and ideal for superficial volume restoration.
**3. Technique:** Experienced injectors utilize precise placement techniques to distribute the filler evenly and blend it seamlessly with your facial contours.
**4. Individual Skin Characteristics:** Thinner skin may show signs of filler more easily compared to thicker skin. Natural pigmentation, sun exposure, and existing wrinkles can also influence visibility.
To minimize noticeability concerns:
1. Choose a Qualified Injector: Seek out a board-certified dermatologist or plastic surgeon with extensive experience in facial injectables.
**2. Discuss Your Concerns:** Openly communicate your desired outcome and any worries about noticeability. A skilled injector will address your concerns and tailor the treatment accordingly.
3. Start Small: If you’re hesitant, consider a gradual approach with smaller injections. This allows you to assess the results and adjust as needed.
**4. Follow Aftercare Instructions:** Proper post-treatment care, such as avoiding excessive sun exposure and massage, can promote optimal healing and minimize the risk of visible irregularities.
Remember that achieving natural-looking results with temple fillers requires a combination of skilled artistry, realistic expectations, and attentive aftercare.
Swelling after tear trough filler injections is a common and expected side effect. It’s essentially your body’s natural response to any kind of trauma, including needles and fillers.
The duration of swelling varies greatly from person to person, influenced by factors such as the amount of filler used, individual healing speed, injection technique, and even personal metabolism.
Typically, initial swelling peaks within 24-72 hours after the procedure. Most patients experience noticeable bruising within the first few days as well.
Over the next few days, swelling gradually subsides, often becoming less prominent by day five or six. By day seven to ten, most of the swelling should have resolved, leaving behind a smoother and more refreshed appearance.
However, it’s important to note that some residual puffiness may linger for up to two weeks in certain individuals.
This initial response is typically mild and manageable with home care measures like cold compresses, gentle massage, and avoiding strenuous activity.
Your practitioner will provide specific instructions tailored to your situation.
Peak Swelling Timeframe
Swelling after tear trough filler injections is a common and expected side effect.
It typically occurs within a few hours of the procedure as the body responds to the filler placement.
The duration of swelling varies from person to person, but generally peaks within **_24-72 hours_** and gradually subsides over the following days.
Most patients experience significant improvement in swelling within **_one week_**, with minimal residual swelling lasting for up to **_two weeks_**.
Several factors can influence the duration and severity of swelling, including:
*
Amount of filler injected
*
Individual’s metabolism and healing rate
*
Technique used during injection
Age
Overall health
Any pre-existing conditions
To minimize swelling, it’s important to follow your injector’s post-procedure instructions carefully, which may include:
*
Applying ice packs to the treated area
Contact Us
It’s Me and You Clinic – Anti-Wrinkle, Dermal Filler and Skincare Clinic, Kingston, Surrey
Kingston upon Thames, Surrey, United KingdomKT2 6LX
*
Elevating the head while sleeping
*
Avoiding strenuous activity or excessive sun exposure
If you experience excessive swelling or any other concerning symptoms, consult your injector immediately.
Gradual Resolution
Swelling after tear trough filler injections is a common side effect and typically begins immediately following the procedure.
The duration of swelling varies greatly from person to person, influenced by factors such as the amount of filler used, individual healing rates, and technique employed during injection.
Generally, expect noticeable swelling for the first 24-48 hours. This may peak at around day 2.
Within a week, most patients experience a significant reduction in swelling, although some residual puffiness might persist for up to two weeks.
The gradual resolution of swelling is a natural part of the healing process as the body reabsorbs the filler and tissues return to their normal state.
It’s important to remember that individual experiences can differ, and some individuals may experience longer-lasting swelling than others.
Factors Affecting Swelling Persistence
Injection Technique
Swelling persistence after tear trough filler injection is a common concern for patients seeking rejuvenation in this area. While most swelling subsides within a week or two, several factors can influence its duration and severity.
One major factor is the individual’s unique physiology. Skin elasticity, vascularity, and healing response all play a role. Patients with thinner skin or more delicate blood vessels may experience more noticeable and longer-lasting swelling.
The type of filler used can also affect swelling. Hyaluronic acid fillers, which are water-based and readily absorbed by the body, generally cause less pronounced and shorter-lived swelling compared to permanent fillers like silicone or collagen.
Injection technique is crucial in minimizing swelling. A skilled injector will use precise placement, small injections, and gentle manipulation of the filler to avoid trauma to surrounding tissues and reduce the likelihood of bruising and inflammation.
The amount of filler injected is another determinant. Larger volumes may naturally lead to more initial swelling, as the body works to accommodate the added material. However, experienced injectors can strategically distribute filler to minimize overall impact on surrounding tissues.
Post-procedure care also influences healing and swelling. Following the injector’s instructions regarding ice application, elevation, and avoiding strenuous activities can help expedite recovery and reduce inflammation.
Certain pre-existing conditions or medications can contribute to swelling. For example, individuals taking blood thinners may experience increased bruising and swelling after injections. It is important to disclose all medical history and medications to the injector before treatment.
It’s crucial to remember that individual results may vary. While most patients experience minimal and temporary swelling, some may encounter more persistent inflammation. Open communication with a qualified injector is essential for addressing any concerns and ensuring optimal outcomes.
Individual Healing Rate
Swelling persistence after tear trough filler injections is a common concern, but the duration varies greatly among individuals. Several factors influence how long swelling lasts and how quickly the treated area heals.
Here are some key factors affecting swelling persistence and individual healing rates:
Filler Type: Different fillers have varying compositions and viscosities, impacting their absorption and associated swelling. Some hyaluronic acid (HA) fillers are designed for faster integration and less pronounced swelling.
Injection Technique: The depth and spread of filler injections influence swelling. More superficial injections may cause more immediate but shorter-lasting swelling compared to deeper placements.
Individual Anatomy and Skin Thickness:** Thinner skin and individuals with thinner subcutaneous tissue may experience more visible swelling as the filler is closer to the surface.
Underlying Conditions: Preexisting conditions like diabetes, thyroid disorders, or autoimmune diseases can potentially affect healing and increase swelling duration.
Age: Healing often takes longer in older individuals due to slower cellular turnover.
Smoking:** Nicotine constricts blood vessels, hindering nutrient delivery and oxygenation to tissues, which can impede healing and prolong swelling.
Medications: Certain medications, particularly anticoagulants (blood thinners), may increase the risk of bruising and bleeding, potentially contributing to swelling.
Sun Exposure:** UV radiation can irritate the skin and delay healing. Avoid excessive sun exposure after filler treatment.
Post-Treatment Care: Following your practitioner’s post-treatment instructions, including avoiding strenuous activity and applying cold compresses, is crucial for minimizing swelling and promoting optimal healing.
It is important to remember that these factors can interact and influence each other. Swelling typically starts to subside within a few days but may take up to two weeks or longer to completely resolve in some cases.
Underlying Skin Conditions
Swelling persistence after tear trough filler treatment can vary significantly from person to person and depends on a complex interplay of factors.
One crucial factor is the individual’s natural healing response. Some people naturally experience more inflammation and swelling than others, which can prolong recovery time.
The amount and type of filler used also play a role. Larger volumes or thicker fillers may lead to more pronounced and longer-lasting swelling.
Injection technique can influence swelling. Injecting too deeply or superficially can contribute to bruising and edema.
Post-treatment care practices are essential for minimizing swelling. Following the provider’s instructions carefully, including avoiding strenuous activity, heat exposure, and alcohol consumption, is crucial.
Underlying skin conditions can significantly impact swelling persistence. Pre-existing inflammatory conditions like eczema or rosacea can exacerbate post-procedure inflammation.
Certain medications, such as blood thinners, can increase the risk of bruising and swelling after filler injections.
Smoking has a detrimental effect on healing and can prolong swelling recovery.
Age can also be a factor. Older individuals may have slower wound healing rates, leading to extended swelling.
Genetics plays a role in determining an individual’s susceptibility to swelling and bruising.
In some cases, persistent or unusual swelling may indicate complications such as infection or an adverse reaction to the filler.
It is important to consult with a qualified medical professional if you experience prolonged or concerning swelling after tear trough filler treatment.
Tips for Minimizing Swelling
Cold Compresses
Swelling after tear trough filler is a common side effect, but there are several tips you can follow to minimize its appearance and duration.
One of the most effective strategies is applying **cold compresses**.
Here’s how to use them effectively:
• Timing is key:** Begin using cold compresses as soon as possible after your procedure.
• **Choose the right tool:** Use a clean, soft cloth or ice pack wrapped in a towel. Avoid direct contact between ice and your skin to prevent frostbite.
• Frequency matters:** Apply cold compresses for 10-15 minutes at a time, several times a day, especially during the first 24-48 hours after treatment.
• **Listen to your body:** If your skin feels numb or excessively cold, remove the compress immediately.
Other helpful tips for minimizing swelling include:
• Elevate your head while sleeping with an extra pillow.
• Avoid strenuous activity or excessive facial movement in the first few days.
• Stay well-hydrated by drinking plenty of water.
• Eat a healthy, balanced diet to support your body’s healing process.
Gentle Elevation
Minimizing swelling after tear trough filler injections is crucial for a smooth recovery and optimal results.
Here are some tips to help reduce swelling:
Gentle Elevation: Elevate your head with an extra pillow while sleeping. This helps drain excess fluid away from the treated area.
Cold Compresses: Apply cold compresses or ice packs wrapped in a towel to the injection sites for 10-15 minutes at a time, several times a day. Cold temperatures help constrict blood vessels and reduce inflammation.
Arnica Cream: Arnica is a natural herb known for its anti-inflammatory properties. Applying arnica cream topically to the swelling can help reduce discomfort and speed up healing.
Hydration: Drink plenty of water to flush out toxins and promote lymphatic drainage.
Avoid Alcohol and Smoking: Alcohol and smoking can increase inflammation and hinder healing. It’s best to avoid these substances for a few days following your treatment.
Limit Sun Exposure: Sunlight can irritate the skin and worsen swelling. Protect the treated area with sunscreen and wear protective clothing.
Remember that swelling is a normal part of the healing process after tear trough filler injections. With proper care and these tips, you can minimize its severity and duration.
Avoidance of Irritants
Minimizing swelling after tear trough filler treatment involves both immediate actions and ongoing lifestyle choices.
Here are some tips to help reduce swelling:
Apply a cold compress: Use an ice pack wrapped in a towel for 15-20 minutes at a time, several times a day. This helps constrict blood vessels and reduce inflammation.
Elevate your head: Sleep with your head elevated on an extra pillow to promote drainage and minimize fluid buildup.
Avoid touching or rubbing the area: Keep hands off the treated area to prevent further irritation and swelling.
While it is tempting, resist the urge to massage or touch the area as this can spread the filler and cause more inflammation.
Certain activities and substances can irritate the treated area and prolong swelling. Here’s what to avoid:
Strenuous exercise: Avoid intense workouts for at least a few days after treatment, as sweating can increase blood flow and inflammation.
Alcohol consumption: Alcohol can dehydrate the body, making swelling worse. It can also thin the blood and increase bruising.
Smoking: Nicotine constricts blood vessels, potentially hindering healing and increasing the risk of complications.
Hot showers or baths: Heat can exacerbate swelling. Stick to lukewarm water for a few days after treatment.
It’s important to follow your practitioner’s specific post-treatment instructions carefully, as they may have additional recommendations based on your individual needs and the type of filler used.
Pain after injection is a common side effect of various medical procedures, including dermal fillers. There are several factors that can contribute to pain experienced after filler injections.
Some of the possible causes of pain include:
The type of filler used
The injection technique
Previous trauma or scarring at the injection site
Sensitivity to the local anesthetic used
Underlying medical conditions, such as arthritis or fibromyalgia
In terms of pain location, it can occur anywhere in or around the injection site.
Local pain at the injection site, which may be sharp, dull, or aching
Discomfort or tenderness to the touch, often felt in the hours following the procedure
Pain that radiates to other areas, such as the face, jaw, or neck
Symptoms that mimic headache, sinus pressure, or migraines
Persistent pain or discomfort that lasts for several days or weeks after the procedure
The location of pain can vary depending on:
The type and amount of filler used
The depth and technique of the injection
Individual differences in anatomy and tissue structure
In general, the most painful places to get fillers tend to be:
The lips, especially for individuals with thin or fragile lip tissue
The nasolabial fold, particularly in areas with deep wrinkles and folds
The marionette lines, which can be sensitive due to the presence of facial muscles and tendons
Areas with previous trauma or scarring, such as scars from acne, surgery, or injury
The temples or forehead, especially for individuals prone to headaches or tension
It’s essential to note that pain after filler injections can be unpredictable and may vary from person to person.
The sensation of pain associated with getting a dermal filler injection can vary from person to person, depending on several factors, including the type of filler used, the location of the injection, and individual tolerance.
One of the main causes of pain during a dermal filler injection is the needle itself. The needle is thin and long, which allows it to penetrate deeper into the skin and access the underlying fat tissue where the filler will be deposited. However, this also means that it can cause discomfort or pain when inserted.
Another cause of pain during filler injections is the local anesthetic used to numb the area before the injection. While this helps to reduce discomfort during the procedure, some people may experience a stinging or burning sensation as the anesthetic takes effect.
The type of filler used can also contribute to pain during an injection. Different fillers have varying textures and consistencies, which can affect how they feel when injected into the skin. For example, hyaluronic acid fillers tend to be smooth and gel-like, while calcium hydroxylapatite fillers are more granular.
Furthermore, the location of the injection is a significant factor in determining the level of pain experienced during a filler treatment. Areas with thicker fat tissue, such as the cheeks or lips, tend to be more painful to inject than areas with less fat tissue, like the forehead or chin.
In addition to these factors, individual tolerance and sensitivity can also play a role in the amount of pain felt during a filler injection. Some people may be more sensitive to needle pokes or have a lower threshold for pain than others.
Other medical conditions, such as nerve damage or fibromyalgia, can also affect the level of pain experienced during filler injections. For example, if an individual has nerve damage in the arm or hand where the needle is inserted, they may experience more pain or discomfort due to referred pain.
Facial expressions and muscle tension can also contribute to pain during filler injections. When a person frowns, smiles, or makes other facial expressions, it can put additional pressure on the muscles and skin in the treated area, making the injection process more painful.
Finally, psychological factors can also impact an individual’s perception of pain during filler injections. Anxiety, stress, or fear of needles can all contribute to a higher level of discomfort or pain during the treatment.
It is essential to note that while some pain during dermal filler injections is normal and temporary, excessive pain or discomfort should always be reported to the practitioner administering the treatment. This ensures that any underlying issues are addressed and that the treatment can proceed safely and effectively.
Pain is a complex and multifaceted phenomenon that can manifest in various ways, depending on the underlying causes. In the case of injections into the face, particularly the cheeks, pain can be a significant concern for individuals considering dermal fillers or other treatments.
Injections into the skin can cause pain due to the activation of _nerve endings_ in the affected area. These nerve endings are responsible for transmitting sensations of pain, temperature, and touch to the brain. When an injection is administered too close to a nerve ending, it can stimulate these nerve endings, leading to pain and discomfort.
One of the primary causes of pain during injections into the face is the proximity to facial _nerve branches_. These nerves originate from the _facial nerve_ (cranial nerve VII) and branch out to innervate various areas of the face, including the cheeks. When an injection is made too close to a facial nerve branch, it can irritate these nerves and cause pain.
Another factor that contributes to pain during injections into the cheek area is the presence of _trigeminal nerve branches_. The trigeminal nerve (cranial nerve V) is a large nerve that provides sensation to the face, including the cheeks. It has three main branches: the ophthalmic, maxillary, and mandibular nerves. When an injection is made too close to these branches, it can stimulate them and cause pain.
Additionally, injections into the cheek area can also cause pain due to the _superficial muscular aponeurosis_. This is a thin layer of tissue that lies just beneath the skin in the cheek area. When an injection is made too close to this tissue, it can irritate the nerve endings embedded within it, leading to pain.
Furthermore, individual tolerance to pain can also play a significant role in the experience of pain during injections into the face. Some people may be more sensitive to pain than others, and their sensitivity can be influenced by various factors such as genetics, anxiety levels, and previous experiences with injections.
It’s worth noting that pain during injections is not always a guarantee, and many individuals who receive dermal fillers or other treatments in the cheek area do not experience significant pain. However, for those who do experience pain, it can be managed through various means such as _topical anesthetics_, _oral pain relievers_, and _distracting techniques_.
Ultimately, the most painful place to get fillers will vary from person to person, depending on their individual anatomy, nerve distribution, and pain tolerance. However, by understanding the underlying causes of pain during injections into the face, individuals can take steps to minimize their risk of experiencing pain and ensure a more comfortable treatment experience.
The human body is comprised of various regions with distinct densities of nerve endings, making some areas more sensitive to pain than others. When it comes to dental fillings, understanding which region of the mouth is most sensitive can help in planning and executing a successful procedure.
One of the key factors to consider is the location of the temporomandibular joint (TMJ) and the surrounding area, particularly the temporal bone. The temporomandibular joint is situated between the mandible (lower jawbone) and the temporal bone of the skull, making it a complex region with multiple nerves and blood vessels.
The temporal area contains an exceptionally high concentration of nerve endings due to its rich innervation by both sensory and motor nerves. This high density of nerve fibers makes this area particularly sensitive to pain, pressure, and manipulation.
Another key factor contributing to the sensitivity of the temporal region is the close proximity to the trigeminal nerve, which is responsible for sensation in the face and head. The trigeminal nerve has three main branches: the ophthalmic, maxillary, and mandibular nerves, each with specific areas of innervation.
The area around the TMJ is particularly susceptible to pain due to its complex anatomy and rich blood supply. This region receives a significant amount of pressure during dental procedures, such as fillings, which can exacerbate existing sensitivities or discomfort.
Additionally, individuals with pre-existing conditions like temporomandibular joint disorder (TMJ-D) or bruxism (teeth grinding) may experience heightened sensitivity in the temporal region due to chronic inflammation and altered biomechanics.
The psychological aspect of pain perception should not be underestimated. The temporal region is also an area where stress and anxiety can manifest physically, further contributing to increased sensitivity.
Considering these factors, the temporal region is likely a particularly sensitive area when it comes to receiving dental fillings due to its high concentration of nerve endings, close proximity to the trigeminal nerve, and complex anatomy.
However, pain perception can vary greatly between individuals, and other regions of the mouth may also be sensitive depending on individual factors such as gum recession, tooth decay, or existing dental work.
It is essential for dentists and patients alike to understand the nuances of pain perception in different regions of the mouth and to take a multidisciplinary approach when addressing any concerns related to dental sensitivity or discomfort.
Ultimately, proper pre-numbing techniques, gentle handling during the filling procedure, and post-procedure care can help minimize discomfort in even the most sensitive areas, ensuring a positive experience for patients receiving dental fillings.
The question of where the most painful place to get facial fillers is a topic of much discussion, with various studies and expert opinions offering insights into the matter.
Studies by the American Academy of Dermatology (AAD) suggest that facial fillers are more painful when injected into areas with higher concentrations of nerve endings. This is because nerve endings are responsible for transmitting pain signals to the brain, making injections in these areas more uncomfortable.
One area that tends to be particularly sensitive is the crow’s feet region, which is located at the outer corner of the eye. This area has a high concentration of nerve endings, making injections here more painful than others.
The temples and forehead are also common sites for pain during filler injections, as these areas have a higher density of nerve endings. However, it’s worth noting that the pain in these areas is often described as mild to moderate, rather than severe.
In contrast, areas like the chin and jawline tend to be less painful during filler injections. This is because these areas have fewer nerve endings, making them relatively less sensitive to injections.
It’s also worth noting that individual tolerance to pain can vary greatly from person to person. Some people may experience more discomfort than others, even in the same area of their face.
The type of filler used can also affect the level of discomfort experienced during an injection. For example, some fillers like hyaluronic acid are generally considered to be less painful than others, such as calcium hydroxylapatite or PMMA.
Additionally, the technique and skill of the injector can also impact the level of pain experienced during a filler injection. An experienced and skilled injector will typically take steps to minimize discomfort and make the process as quick and comfortable as possible.
In terms of specific statistics, one study published in the Journal of Clinical and Aesthetic Dermatology found that patients reported more pain when fillers were injected into the nasolabial fold (the area between the nose and mouth) compared to other areas of the face.
Another study published in the European Journal of Plastic Surgery found that patients experienced significantly less pain when fillers were injected into the chin area compared to other areas, such as the temples or crow’s feet region.
In conclusion, while some areas of the face may be more painful than others when it comes to facial filler injections, individual tolerance to pain and the specific technique and skill of the injector can also play a significant role in determining the level of discomfort experienced.
The perception of pain can vary greatly from person to person, and what may be a mildly uncomfortable sensation for one individual may be excruciatingly painful for another. However, when it comes to dermal fillers, certain areas of the body are more sensitive than others due to a combination of factors such as fatty tissue composition, nerve endings, and muscle tension.
One of the most common causes of pain associated with filler injections is the presence of nerve endings in the skin. Nerve endings can be found throughout the body, but they tend to be more concentrated in areas with higher sensory activity, such as the lips, cheeks, and chin. When a filler needle pierces these nerve endings, it can stimulate a sharp, stabbing pain that may radiate for a short period of time.
Another cause of pain during filler injections is the breakdown of adipose tissue. Fatty tissue contains a unique type of connective tissue that can be prone to breaking down when subjected to trauma or injection. As this tissue breaks down, it can release chemical signals that trigger inflammation and lead to pain. In areas with higher amounts of fatty tissue, such as the hips, thighs, and buttocks, this breakdown can lead to increased discomfort during filler injections.
Muscle tension is also a significant contributor to pain during filler injections. Muscles in the face, neck, and head are highly sensitive to injection stimuli due to the presence of nerve endings and connective tissue. Tight muscles can cause spasms or cramping, which may exacerbate discomfort and make the treatment more painful.
Furthermore, areas with higher concentrations of collagen and elastin fibers tend to be more sensitive to filler injections. These fibers provide structure and support to the skin, but they also contain nerve endings that can respond to injection stimuli. As a result, areas such as the nasolabial folds, marionette lines, and forehead are often reported to be more painful during filler treatment.
Individual differences in pain perception are also an essential factor to consider. Some people may have a lower tolerance for pain due to genetic predisposition, previous experiences with pain, or certain medical conditions. Additionally, individuals who are more anxious or stressed before receiving fillers may perceive the treatment as more painful than those who are relaxed and calm.
Lastly, it’s worth noting that some areas of the face and body contain a higher concentration of scar tissue, which can also contribute to pain during filler injections. Scar tissue contains a different type of collagen and elastin fibers than normal skin, making it more prone to breaking down and releasing inflammatory chemicals. When filled with fillers, these areas may experience increased discomfort as the needle pierces through the scar tissue.
Pain Management and Treatment
Pain management is a crucial aspect of any cosmetic treatment, including dermal fillers. While injectable fillers can be minimally invasive and relatively painless, some areas of the body are more sensitive than others.
The face, neck, and hands are common locations for filler treatments, but they also pose a higher risk of discomfort or pain. The most painful place to get a filler injection is often considered to be the masseter muscle in the jawline.
Contact Us
It’s Me and You Clinic – Anti-Wrinkle, Dermal Filler and Skincare Clinic, Kingston, Surrey
Kingston upon Thames, Surrey, United KingdomKT2 6LX
The masseter muscle is one of the muscles used in chewing, and it’s located just below the zygomatic bone (the cheekbone) and above the mandible (jawbone). This area contains a high concentration of nerve endings, making it more sensitive to injection.
Other areas that may be more painful when getting a filler treatment include the temple, the orbital rim, and the nasolabial fold. These locations are close to the eyes, nose, and mouth, which can increase sensitivity to pain.
Topical anesthetics, such as lidocaine or benzocaine, can be applied to the skin before a filler treatment to numb the area and reduce discomfort. However, these creams may not completely eliminate pain, especially in more sensitive areas like the masseter muscle.
Medications that are often prescribed to manage pain associated with dermal fillers include acetaminophen (Tylenol) or ibuprofen (Advil). These over-the-counter medications can help alleviate mild to moderate pain and discomfort after a treatment session.
In some cases, a stronger pain medication may be necessary to manage more severe pain. In this scenario, your healthcare provider may prescribe a prescription-strength pain reliever like oxycodone or codeine. However, these medications should only be used under the guidance of a qualified medical professional.
Local anesthetics, such as lidocaine or novocaine, can also be administered via injection before a filler treatment to numb the area completely. These medications are typically effective for short-term pain management and can help minimize discomfort during the procedure.
Other treatments that may be used in conjunction with dermal fillers to manage pain include nerve blocks or injections of corticosteroids to reduce inflammation and swelling. In some cases, your healthcare provider may also recommend relaxation techniques, such as deep breathing or meditation, to help manage anxiety or stress associated with the treatment.
A comprehensive pain management plan should always be tailored to an individual’s specific needs and medical history. It’s essential to discuss any concerns about pain or discomfort with a qualified healthcare professional before undergoing a dermal filler treatment.
Pain management plays a crucial role in the treatment process after undergoing a **dermal filler** injection. The goal of pain management is to minimize discomfort and promote healing during and after the procedure.
The location of the filler injection is a significant factor in determining the level of pain experienced by the individual. In general, injections administered into the subcutaneous tissue (just beneath the skin) are associated with less pain compared to those injected into the superficial fascia (the layer of tissue just beneath the skin).
The **perioral region** is often cited as one of the most painful areas for dermal filler injections, particularly when administering fillers such as **hyaluronic acid** or **calcium hydroxylapatite**. This area involves multiple nerve endings and has a relatively thin layer of subcutaneous tissue, making it more sensitive to pain.
In contrast, submandibular injections, which target the jawline, are generally reported to be less painful due to the presence of larger fat deposits in this area. However, some individuals may still experience mild discomfort or temporary swelling at the injection site.
A thorough pre-treatment consultation with a qualified healthcare professional is essential to discuss pain management options and create a personalized treatment plan. This may include topical anesthesia, such as lidocaine or benzocaine, applied directly to the skin before the procedure; oral analgesics, like acetaminophen or ibuprofen, taken before or after treatment; and ice pack applications to reduce swelling and ease discomfort.
Facial fillers can be administered in various ways to minimize pain. For example, some practitioners use a nanofiller technique, which involves breaking up larger particles into smaller, more manageable pieces to distribute the filler evenly throughout the area.
Careful consideration must also be given to patient expectations and pre-existing conditions that may increase sensitivity or discomfort during and after treatment. Factors such as skin condition, allergies, and previous pain experiences can significantly impact the level of pain experienced during a dermal filler injection.
The question of where the most painful place to get fillers is a common concern for many individuals considering dermal fillers. While pain management and treatment options are available, it’s essential to understand the anatomy of the face and how different areas react to injections.
Facial fillers work by injecting glycerin-filled microspheres or hyaluronic acid into the skin to add volume, correct wrinkles, and enhance facial features. However, the process can be painful for some individuals, with some areas being more sensitive than others.
A study published in the Journal of Clinical and Aesthetic Dermatology (JCAD) investigated the use of topical anesthetics in reducing pain during filler injections. The study found that topical anesthetics such as lidocaine or benzocaine can significantly reduce facial pain during filler injections.
The most painful areas for filler injections tend to be those with a high concentration of nerve endings, including the nasolabial fold, marionette lines, and the oral commissure. The nasolabial fold, which runs from the nose to the mouth, is a common site for fillers to be placed, but it’s also one of the most sensitive areas.
The marionette lines, located beneath the mouth, are another area that can be painful during injections. This is due to the high concentration of nerve endings in the lower lip and chin area. The oral commissure, which is the corner of the mouth where the lips meet, is also a sensitive area.
On the other hand, areas with fewer nerve endings tend to be less painful, such as the temple area, forehead, and cheekbones. However, it’s essential to note that even in these areas, some discomfort may still occur due to the needle insertion process.
To minimize pain during filler injections, it’s recommended to use a combination of pain management techniques, including topical anesthetics, ice packs, and massage before treatment. Your healthcare provider or a licensed aesthetician can also use specialized equipment, such as a nerve block or local anesthesia, to numb the area.
Additionally, some fillers are designed to be more comfortable than others. For example, hyaluronic acid-based fillers tend to have a smoother texture and a lower incidence of pain compared to calcium hydroxylapatite-based fillers.
The American Society for Dermatologic Surgery (ASDS) recommends using a combination of techniques to minimize discomfort during filler injections, including:
Topical anesthetics: Lidocaine or benzocaine can be applied topically before treatment to numb the skin and reduce pain.
Pain relief medications: Over-the-counter pain relievers such as ibuprofen or acetaminophen can help manage discomfort after treatment.
Ice packs: Applying ice packs to the area before and after treatment can help numb the skin and reduce swelling.
Massage techniques: Gentle massage can be used before treatment to relax the muscles and reduce discomfort.
Breathing exercises: Deep breathing exercises can help manage anxiety and discomfort during treatment.
It’s essential to consult with a qualified healthcare provider or licensed aesthetician to determine the best course of treatment for your individual needs. By understanding the anatomy of the face and using a combination of pain management techniques, you can minimize discomfort and achieve the desired results from dermal fillers.
Pain management is a crucial aspect of any medical treatment, including cosmetic procedures like dermal fillers. Understanding the potential pain associated with various treatments can help patients make informed decisions about their care.
The location on the body where filler is administered can significantly impact the level of discomfort or pain experienced during and after the procedure. While some areas are generally considered more painful than others, it’s essential to note that individual tolerance and pain perception can vary greatly from person to person.
In general, areas with higher fat content or where nerves are closer to the surface tend to be more sensitive and potentially more painful during filler injections.
Facial areas such as the lips, cheeks, and nose are commonly treated with fillers. These regions have a relatively high concentration of nerve endings, which may lead to some discomfort or pain during treatment. The orbicularis oris muscle, located around the mouth, is particularly sensitive due to its rich nerve supply.
Another area that can be more painful is the temple region, where fillers are often used to treat nasolabial folds and marionette lines. The frontal nerve runs close to this area, contributing to increased sensitivity during injections.
Hands and feet are also treated with fillers, particularly for wrinkle reduction and volume augmentation in the fingers and toes. These areas have a high concentration of nerve endings and can be more sensitive due to their proximity to tendons and ligaments.
Avoiding movement or tension while getting filler treatments can help minimize discomfort. For example, avoiding smiling during lip fillers or tensing up when injections are made in the forehead area.
Topical anesthesia creams, such as lidocaine or benzocaine, may be applied before treatment to numb the skin and reduce pain. However, these anesthetics have varying levels of effectiveness and should not replace medical guidance from a qualified professional.
While some patients experience minimal discomfort during filler treatments, others may find it more challenging to manage. In such cases, combining treatment with relaxation techniques, such as deep breathing or meditation, can aid in pain management.
A well-informed discussion between the patient and healthcare provider about potential pain levels and available options is vital for a comfortable filler treatment experience.
Medications such as ibuprofen (Advil) and acetaminophen (Tylenol) may be prescribed to manage minor side effects, including pain, after treatment. Patients can also consider over-the-counter topical creams containing capsaicin or menthol to help reduce inflammation and discomfort.
A medical professional’s expertise is essential in evaluating individual patient needs and providing tailored advice on the best approach for managing potential pain during filler treatments.
Risk Factors and Complications
The question of where the most painful place to get a filler is can vary depending on several factors, including individual variations and responses to pain. However, there are some common areas where people often experience more discomfort after receiving a filler injection.
Risk Factors:
Age: Older adults may be more sensitive to pain due to decreased circulation and nerve sensitivity
Skin type: People with thin or fragile skin may be more prone to bruising and swelling, which can exacerbate pain
Medical conditions: Certain conditions such as arthritis, fibromyalgia, or chronic pain syndrome can make individuals more sensitive to pain
Medications: Taking certain medications, such as blood thinners or painkillers, can increase the risk of bruising and swelling
Allergies: Some people may be allergic to the ingredients used in fillers, which can cause an inflammatory response and increased pain
Complications:
Infection: As with any injection, there is a risk of infection with filler injections, which can lead to pain, redness, and swelling
Bleeding or bruising: Fillers can cause bleeding or bruising at the injection site, which can be painful and take several days to resolve
Allergic reactions: In rare cases, people may experience an allergic reaction to the filler, which can cause increased pain, redness, and swelling
Nerve damage: There is a small risk of nerve damage with filler injections, which can cause numbness, tingling, or pain in the affected area
Individual Variations:
Genetic predisposition: Some people may be more sensitive to pain due to genetic factors
Sensory sensitivity: Individuals with sensory processing disorders or anxiety may be more sensitive to pain
Previous experiences: People who have had previous painful injections or surgeries may be more anxious and sensitive to pain during fillers
Response to Pain:
Pain perception: Individual differences in pain perception can affect how much discomfort is experienced after a filler injection
Mood and emotional state: Stress, anxiety, or depression can impact pain tolerance and response
Sleep and fatigue: Lack of sleep or fatigue can increase sensitivity to pain
Most painful places to get a filler:
The back of the hand (dorsum) is often reported as one of the most painful areas due to its thin skin and high concentration of nerve endings
The tops of the feet can also be painful, especially in individuals with sensory sensitivities or past traumas
Other common pain locations include the buttocks, thighs, and arms, although these can vary depending on individual factors
The procedure for injecting fillers, such as hyaluronic acid or calcium hydroxylapatite, involves inserting a small needle into the skin to deposit the filler material. While generally considered safe, there are some risk factors and potential complications associated with this treatment.
Some of the most common risk factors for complications include:
Injecting too much filler can lead to lumps, swelling, or bruising at the injection site. This is more likely to occur if the injector overestimates the amount of filler needed.
Injecting into a blood vessel, which can cause redness, swelling, bruising, or even nerve damage.
Using low-quality or expired fillers, which can lead to adverse reactions or reduced effectiveness.
Poor skin elasticity or laxity, as this can make it more challenging for the injector to achieve optimal results and may increase the risk of complications.
Using filler in areas with active acne, rosacea, or other skin conditions that can cause inflammation.
In terms of pain levels, some of the most painful places to receive fillers include:
The temporal region (the area around the temple), which is located close to the nerve endings in this area and may be more sensitive for some individuals.
The nasolabial fold, which can be a challenging area to treat due to its thin skin and prominent nerves.
The lips themselves, particularly if the injector needs to work in a curved or angular fashion to achieve the desired shape and volume.
However, it’s essential to note that many individuals do not experience significant discomfort during the procedure, and some may even find it relatively painless. The use of topical anesthetics, such as lidocaine or benzocaine, can help reduce any discomfort or pain associated with the treatment.
In addition to pain, there are also some potential long-term complications that individuals should be aware of:
Asymmetry: The filler may not distribute evenly, leading to unevenness in the treated area.
Granulomas: A type of localized inflammation caused by an immune response to the filler material.
Lumps or nodules under the skin.
Bleeding or hematoma (a collection of blood) at the injection site.
Skin necrosis: A rare but potentially severe complication where a small area of skin dies due to lack of blood flow.
It’s essential to consult with an experienced and qualified injector who can assess your individual needs and provide personalized guidance on the most effective and safe treatment options for you.
The perception of pain is a highly individualized and subjective experience, making it challenging to pinpoint a single “most painful” location for filler injections. However, based on various studies and expert opinions, some areas are generally considered to be more sensitive than others.
Temples: The temporal region, including the area above the _eyebrows_ , is often cited as one of the most sensitive areas for filler injections. This is due to the presence of numerous nerve endings, which can make the procedure more uncomfortable.
Mouth corners and nasolabial folds**: The mouth corners, particularly the area known as the _philtrum_ , and the nasolabial folds (the creases that run from the nose to the mouth) are also considered sensitive areas. These locations require a high degree of precision when injecting fillers to avoid nerve damage or causing **unwanted swelling**.
Hands**: Filler injections in the hands can be quite uncomfortable, especially if the practitioner is working near tendons, nerves, or blood vessels. This is because the dermatome layer is thinner in this area, making it more prone to complications such as **infection**.
Skin laxity and sagging**: In areas with significant skin laxity_ or sagging, injectors may need to work harder to achieve the desired results, which can increase the discomfort level. Additionally, fillers may be required in greater volumes, further exacerbating the pain.
Overcorrection**: Another common complication is overcorrection, where too much filler is injected, leading to **unwanted swelling**, redness, and inflammation. This can be particularly painful and take several days to resolve.
It’s essential for individuals seeking filler injections to have realistic expectations regarding pain levels and potential complications. Discussing their individual risk factors and concerns with a qualified and experienced injector is crucial in ensuring the best possible outcome.
Furthermore, modern fillers are designed to be less irritating than earlier versions, reducing the risk of adverse reactions and discomfort. However, it’s still vital for patients to inform their injectors about any allergies_ , medical conditions, or medications they’re taking, as these can affect the filler choice and injection process.
Ultimately, finding a reputable and skilled injector who takes the time to understand individual pain tolerance and risk factors is crucial in creating a comfortable and effective filler injection experience.
The decision to undergo dermal fillers, also known as cosmetic fillers, involves understanding the potential risks and complications associated with the procedure. While generally considered safe, dermal fillers can cause a range of side effects, some of which can be temporary while others may be more serious.
Some common risks and complications of dermal fillers include:
Infection: As with any surgical procedure, there is a risk of infection with dermal fillers. This is usually mild and can be treated with antibiotics. However, in rare cases, the infection can spread and become more serious.
Allergic reactions: Some people may be allergic to certain ingredients used in dermal fillers, such as lidocaine or sodium chloride. An allergic reaction can cause symptoms ranging from mild redness and swelling to life-threatening anaphylaxis.
Swelling, bruising, and bleeding: These are common side effects of dermal fillers, particularly in the treated area. The severity of these reactions can vary depending on the individual and the type of filler used.
Asymmetrical results: Dermal fillers can cause uneven or asymmetrical results, especially if the procedure is not performed by a skilled professional or if the individual has poor skin elasticity.
Nerve damage: The nerves in the face can be sensitive and are at risk of damage during dermal filler injections. This can cause numbness, tingling, or pain in the treated area.
Scarring: While rare, scarring can occur with dermal fillers if the body reacts poorly to the filler material.
Prolonged reactions: Some individuals may experience prolonged swelling, redness, or bruising after a dermal filler procedure. These reactions can last from several days to several weeks.
Filler migration: Dermal fillers can migrate out of the treated area over time, which can cause uneven results or the need for additional procedures.
Temporary flaccid paralysis: This rare condition occurs when a filler material causes temporary weakness or paralysis of the facial muscles. It is usually mild and resolves on its own.
Long-term complications: In rare cases, dermal fillers can cause long-term complications such as granulomas (abnormal growths), scarring, or permanent nerve damage.
As for the most painful place to get filler, this is highly subjective and can vary from individual to individual. However, some areas are generally considered more sensitive than others:
Fine lines around the eyes: The skin around the eyes is thin and delicate, making it a sensitive area for injections.
Lips (especially the Cupid’s bow): The lip area is highly sensitive due to the presence of nerve endings and blood vessels.
The nose: Injecting dermal fillers into the nose can be painful, especially if you have a deviated septum or other anatomical irregularities.
The mouth (buccal area): The buccal area is sensitive due to the presence of nerve endings and blood vessels, making it a potentially painful place for injections.
It’s essential to note that pain during dermal filler procedures can be managed with topical anesthesia, cold compresses, or other measures. It’s also crucial to choose a qualified and experienced professional to administer the filler to minimize any discomfort or complications.
Kingston upon Thames, Surrey, United KingdomKT2 6LX
Hyaluronic Acid
Lip fillers are primarily composed of substances designed to add volume and fullness to the lips.
Hyaluronic acid (HA) is one of the most common ingredients used in lip fillers.
It is a naturally occurring substance found in the body, particularly in skin, connective tissues, eyes, and joints. HA’s ability to attract and hold water makes it an ideal candidate for lip augmentation.
When injected into the lips, HA attracts water molecules, plumping up the tissue and creating a fuller appearance.
HA-based fillers are generally considered safe and effective, with minimal side effects.
They are also reversible, meaning that if you’re unhappy with the results, an enzyme called hyaluronidase can be injected to break down the filler.
Other common ingredients found in lip fillers include: calcium hydroxyapatite (CaHA), poly-L-lactic acid (PLLA), and synthetic collagen.
Each ingredient has its own unique properties and benefits.
Other Additives
Lip fillers are primarily composed of hyaluronic acid (HA). HA is a natural substance found in the body, responsible for skin hydration and elasticity.
Other common ingredients include:
– Anesthesia: Lidocaine or other local anesthetics are often added to minimize discomfort during the injection process.
– Cross-linking agents: These chemicals create a more durable gel by linking HA molecules together, extending the filler’s longevity.
Some fillers may also contain:
– Preservatives: To prevent bacterial growth and ensure product sterility.
– Stabilizers: To maintain the gel’s consistency over time.
The specific ingredients and their concentrations can vary depending on the brand and type of lip filler.
Lip fillers are a popular cosmetic treatment that can enhance the appearance of lips by adding volume, definition, and fullness.
Here are some benefits of lip fillers:
Increased Lip Volume
Improved Lip Shape and Definition
Smoother Lips
Enhanced Facial Symmetry
Reduced Appearance of Fine Lines and Wrinkles Around the Mouth
Boost in Self-Confidence
Lip fillers can help to restore lost volume, which often occurs with age as collagen production decreases. By injecting filler into the lips, a fuller and more youthful appearance can be achieved.
Furthermore, lip fillers can improve the shape and definition of the lips by enhancing their contours. This can create a more balanced and harmonious facial profile. The smoother texture of lips after treatment can also enhance overall aesthetics.
The results of lip filler injections are typically immediate and last for several months to a year, depending on the type of filler used and individual factors such as metabolism and lifestyle.
Improved Symmetry
Lip fillers are a popular cosmetic procedure used to enhance and reshape lips, creating a fuller, more defined look. The benefits extend beyond aesthetics, positively impacting self-esteem and confidence.
One of the most significant advantages is the ability to achieve improved symmetry in the lips. People often have subtle or pronounced asymmetries in their lips that can be addressed with lip fillers. By strategically injecting filler into areas needing augmentation, a more balanced and harmonious appearance can be achieved.
Lip fillers also help define and enhance the natural shape of the lips. They can create fuller, rounder contours, increase lip volume, and accentuate the Cupid’s bow. This can result in a more youthful, plump look that enhances facial features.
Another benefit is the ability to restore lost volume due to aging. As we age, our lips naturally lose collagen and fat, leading to thinning and flattening. Lip fillers effectively replenish this lost volume, restoring a fuller appearance and reversing signs of aging.
Furthermore, lip fillers can improve the definition of the lip line. By injecting filler along the border of the lips, the outline becomes more pronounced and defined, giving the illusion of larger, more sculpted lips.
Potential Risks and Side Effects
Allergic Reactions
Potential risks and side effects associated with lip fillers can vary depending on the specific product used, individual patient factors, and the skill of the injector.
Common Side Effects:
Swelling: This is the most common side effect and typically peaks within a few days after treatment.
Bruising: Minor bruising can occur at the injection sites.
Redness:
Tenderness or pain:
Numbness:
Less Common but More Serious Risks:
Infection: Any injection carries a risk of infection, so proper hygiene and sterile techniques are essential.
Vascular occlusion: This rare but potentially serious complication occurs when filler material blocks blood flow to an area, leading to tissue damage.
Granuloma formation: Small nodules can form under the skin as a result of the body’s immune response to the filler.
Asymmetry: If fillers are not injected evenly, it can result in an asymmetrical appearance.
Allergic Reactions:
While rare, some individuals may have allergic reactions to the ingredients in lip fillers.
Symptoms of an allergic reaction can include hives, itching, swelling, difficulty breathing, or dizziness. It is essential to seek medical attention immediately if any of these symptoms occur.
Minimizing Risks:
Choose a qualified and experienced injector who uses FDA-approved fillers.
Discuss your medical history, including allergies, with the injector before treatment.
Follow the injector’s post-treatment instructions carefully.
Be aware of potential side effects and seek medical attention if you experience any concerning symptoms.
Lip fillers are primarily composed of hyaluronic acid (HA), a naturally occurring substance found in the body that helps to hydrate and plump skin. However, like any medical procedure, there are potential risks and side effects associated with lip filler injections.
Potential side effects can be categorized as temporary or long-term. Temporary side effects, which typically resolve within a few days to weeks, include:
*
Swelling: This is the most common side effect and can range from mild to moderate.
*
Bruising: Small bruises may appear around the injection sites.
*
Redness and tenderness: The treated area may feel warm, red, and tender to the touch.
Less common temporary side effects include:
*
Lumps or bumps: These can occur if the filler is not evenly distributed.
*
Asymmetry: It’s possible for one lip to appear slightly larger or different than the other.
*
Infection: While rare, infection can occur at the injection site.
Long-term side effects are less common but can include:
*
Migration of the filler: In some cases, the filler may move from its original location.
*
Capsular contracture: This involves the formation of scar tissue around the filler, which can make the lips feel hard and lumpy.
It’s important to note that individual results may vary, and not everyone who receives lip fillers will experience side effects.
Choosing a qualified and experienced injector is crucial for minimizing risks and achieving desired outcomes.
Always discuss your medical history, any medications you are taking, and your expectations with your injector before undergoing the procedure.
The preauricular area is a specific anatomical region located on the face. It’s found just in front of and slightly below the external ear (pinna).
Imagine tracing a line from the tip of your earlobe straight upward, then curving slightly inward towards the top of your head. The area where that imaginary line intersects with your skin is generally considered the preauricular region.
This area is often marked by a small depression or notch on either side of the face and can sometimes be associated with a shallow dimple, known as a preauricular pit. These pits may contain tiny hair follicles and are considered normal anatomical variations in many individuals.
The preauricular area is particularly relevant in medical contexts.
Surgeons might operate on this region during procedures involving the ear or nearby facial structures.
Physicians also examine the preauricular area to assess for any abnormalities, such as cysts, abscesses, or congenital malformations.
External Anatomy
The preauricular area refers to the region situated in front of (pre-) the auricle, also known as the external ear.
It’s a prominent landmark on the face, often noticeable due to the presence of a small dimple or fold of skin.
This area can exhibit variations in appearance and prominence among individuals.
The exact location can be described as anterior to the helix (the curved upper portion of the ear) and superior to the parotid gland, which is a salivary gland located just below the ear.
Some individuals may have an external opening, known as the preauricular sinus, in this area.
Clinical Significance
Congenital Differences Infections and Inflammation
The preauricular area is the region situated *anterior* to (in front of) and *superolateral* to (above and to the side of) the external ear.
It’s a significant site in anatomical context due to several factors:
Clinical Significance: The preauricular area is often associated with certain conditions.
Preauricular sinuses: These are small, congenital fistulas or cysts that may present as dimples or bumps near the ear.
Infections: This area can be susceptible to infections due to its proximity to hair follicles and potential for trauma.
Congenital Differences: Variations in the preauricular area are not uncommon.
These can include extra auricles (accessory ears), abnormal ear folds, or unusual skin markings.
Inflammation: The preauricular area can become inflamed due to various reasons such as infections, trauma, or allergies.
Beyond the Basics
Anatomical Variations
The term “preauricular” refers to a location situated in front of the ear, specifically on the cheek.
Anatomical variations exist in the human body, meaning not everyone has the same structures or features in exactly the same place. These variations can be subtle or more pronounced, and they are a natural part of human diversity.
Contact Us
It’s Me and You Clinic – Anti-Wrinkle, Dermal Filler and Skincare Clinic, Kingston, Surrey
Kingston upon Thames, Surrey, United KingdomKT2 6LX
When considering the preauricular area, anatomical variations might involve:
The position of the external auditory canal opening relative to the surrounding structures. Some individuals may have a slightly higher or lower ear canal opening compared to others.
The size and shape of the concha, the bowl-shaped area of the outer ear. Concha size can vary considerably between individuals.
It is important to remember that anatomical variations are normal. Understanding these variations helps healthcare professionals interpret medical images, perform procedures accurately, and provide personalized care.
Beyond basic anatomical descriptions, understanding the location of specific structures like the preauricular area necessitates a deeper dive into imaging techniques. These techniques provide clinicians with detailed visual representations of internal body parts, allowing for precise localization.
One crucial technique is ultrasound, which uses sound waves to create images. Its non-invasive nature and ability to visualize soft tissues make it particularly useful in identifying anatomical landmarks, including the preauricular area.
Computed tomography (CT) scans utilize X-rays to generate cross-sectional images of the body. These detailed images allow for precise identification of bone structures surrounding the ear and can aid in determining the exact location of the preauricular area relative to these bones.
Magnetic resonance imaging (MRI) employs strong magnetic fields and radio waves to produce high-resolution images of tissues. MRI excels at visualizing soft tissues and can provide a clear view of the structures around the ear, including the preauricular area. Its ability to differentiate between different types of tissue makes it especially valuable in complex cases.
These imaging techniques, when used appropriately, allow clinicians to confidently pinpoint the location of the preauricular area, aiding in accurate diagnoses and treatment planning.
Lip filler removal is a process that requires careful consideration and preparation to ensure a successful and minimally invasive treatment.
Before undergoing lip filler removal, it’s essential to understand the removal process and what to expect.
Risk assessment: A thorough risk assessment should be conducted to identify any potential complications or concerns. This may include a review of your medical history, current medications, and any previous treatments.
Surgical vs Non-Surgical Removal: Lip filler removal can be performed through either surgical or non-surgical methods. Surgical removal involves making incisions to remove the filler, while non-surgical methods utilize specialized tools and techniques to dissolve or extract the filler.
Non-Surgical Removal Methods:
Dissolution therapy: This method uses a chemical solution to break down and dissolve the lip filler. The solution is applied directly to the affected area, and the filler is gradually absorbed by the body over time.
Extraction: This method involves using specialized tools to carefully extract the lip filler from under the skin. This can be a more invasive process, but it allows for the removal of larger quantities of filler.
Pre-Removal Preparation:
Stop using fillers for at least 2 weeks: Before undergoing lip filler removal, it’s essential to stop using any temporary fillers or injections in the treated area. This will help prevent any interference with the removal process and ensure a more accurate assessment.
Avoid sun exposure: Exposure to direct sunlight can cause the filler to become more noticeable after removal, leading to increased visibility of the treated area. Avoiding sun exposure for at least 2 weeks before treatment is recommended.
Topical Anesthesia: Topical anesthesia may be applied to numb the skin and reduce any discomfort or pain during the removal process.
Pre-Removal Instructions:
Follow a healthy diet: Eating a balanced diet rich in fruits, vegetables, and whole grains can help support your overall health and aid in the healing process after treatment.
Stay hydrated: Drinking plenty of water is essential to help flush out toxins and promote healthy tissue repair.
Aftercare:
Schedule a follow-up appointment: Following removal, it’s crucial to schedule a follow-up appointment with your healthcare professional to ensure the treated area is healing properly.
Avoid strenuous activities: For the first few days after treatment, avoid any strenuous activities that may cause discomfort or irritation.
Lip filler removal can be an effective way to remove unwanted filler from the lips. By understanding the process and following pre-removal preparation instructions, you can minimize risks and ensure a successful treatment outcome.
Stop Injections Immediately
Lip filler removal, also known as lip filler dissolution or lip augmentation reversal, is a process that aims to eliminate the effects of temporary or permanent lip fillers inserted into the lips for aesthetic purposes.
Understanding how these fillers work and the methods used to remove them are crucial in minimizing complications and achieving optimal results. Lip fillers, such as hyaluronic acid (HA) fillers, calcium hydroxylapatite (CaHa) fillers, and poly-L-lactic acid (PLLA) fillers, are designed to be biocompatible and biodegradable.
When inserted into the lip tissue, these fillers are broken down by the body’s natural processes. However, in some cases, the removal process can be hastened or facilitated using various methods.
Intravenous administration of an enzyme called hyaluronidase has been shown to break down HA-based fillers within a few days. This treatment is usually administered through an intravenous line, and its efficacy varies from person to person.
Another approach involves the use of an injectable treatment that combines hyaluronidase with other medications to accelerate the breakdown process. However, this method requires professional medical supervision due to potential side effects.
A more conservative approach involves simply allowing time for the fillers to degrade naturally. In some cases, this can take several months or even years, depending on various factors such as filler type, dosage, and individual metabolism.
It’s essential to note that lip filler removal may not always be possible or advisable, particularly if the fillers have been integrated into the lip tissue for an extended period. In such cases, surgical intervention might be necessary to remove excess filler material.
Say goodbye to unwanted lip fillers and learn how to safely remove them from your lips with professional medical guidance.
Consult with a qualified healthcare professional or dermatologist for guidance.
Lip filler removal can be a bit of a tricky process, as it requires careful consideration and professional guidance to achieve optimal results.
The primary goal of lip filler removal is to eliminate any remaining filler material from the lips while minimizing scarring and promoting healthy tissue regeneration.
A qualified healthcare professional or dermatologist should be consulted for personalized advice on the best course of action, as they can assess individual circumstances and provide tailored guidance.
During a consultation, the healthcare professional will examine the lips to determine the extent of filler material remaining after the procedure.
They may use various methods to identify the type of filler used, including visual inspection, ultrasound imaging, or biopsy samples, in some cases.
The next step involves developing an individualized treatment plan, which may include a combination of surgical removal, injections, and topical treatments.
Surgical removal typically involves surgically excising the excess filler material, followed by closure of the incision site with stitches or sutures.
In some cases, laser treatment or radiofrequency ablation may be employed to break down the filler material before its removal.
After the procedure, it’s essential to follow a comprehensive aftercare regimen to promote healing and minimize complications, such as swelling, bruising, and scarring.
This may include applying ice packs to reduce inflammation, avoiding strenuous activities, and using topical creams or gels to soothe the skin.
Patients should also be advised on how to manage pain and discomfort, which can range from mild to moderate, depending on the extent of the procedure.
It’s also crucial for patients to maintain realistic expectations regarding the removal process, as it may take several sessions to completely eliminate all filler material.
A follow-up appointment with a qualified healthcare professional or dermatologist is necessary to assess progress and make any necessary adjustments to the treatment plan.
In some instances, a combination of medical and aesthetic treatments may be required to achieve optimal results, such as dermal fillers, botulinum toxin injections, and chemical peels.
It’s also essential for patients to understand that lip filler removal can have varying degrees of success, depending on factors like the type and quantity of filler used, individual skin types, and overall health conditions.
However, with proper care and professional guidance, many individuals are able to achieve satisfactory results from lip filler removal procedures.
Dissolve the Filler
Lip filler removal is a complex process that requires patience, dedication, and proper guidance to achieve optimal results.
The first step in understanding lip filler removal is to comprehend how fillers work. Dermal fillers are injectable materials made of collagen, hyaluronic acid, or calcium hydroxylapatite, which are designed to fill in wrinkles, folds, and defects on the face.
When injected into the lips, fillers help restore volume, smooth out fine lines, and enhance lip shape. However, if not removed properly, fillers can lead to serious complications, such as swelling, bruising, scarring, or even facial asymmetry.
The removal process typically involves a combination of medical techniques and products. The most common methods include the use of hyaluronidase, an enzyme that breaks down hyaluronic acid-based fillers; dissolvable sutures; and massage therapy.
Hyaluronidase is usually administered via injection or orally to help dissolve the filler. This enzyme works by breaking down the hyaluronic acid molecules into smaller fragments, which are then absorbed by the body.
The process of lip filler removal with hyaluronidase can take anywhere from a few days to several weeks to complete, depending on the individual’s response and the amount of filler used. During this time, the person may experience some discomfort, swelling, or bruising at the injection site.
Another method used for lip filler removal is dissolvable sutures. These are tiny, thread-like materials that are inserted under the skin to help absorb excess fat or filler material.
Dissolvable sutures work by releasing slowly over time, allowing the body to naturally absorb the excess filler. This process typically takes several weeks to months and may require multiple procedures to achieve optimal results.
Massage therapy is also a key component of lip filler removal. Gentle massage techniques can help break down and remove excess filler material by increasing blood flow and stimulating lymphatic drainage.
Massage therapists use a combination of manual techniques, including kneading, rolling, and tapping, to target specific areas under the lips and surrounding skin. This process helps loosen and dissolve the filler material, allowing it to be absorbed more efficiently.
It’s essential to note that lip filler removal is not always a straightforward process. The success of removal depends on various factors, including the type of filler used, its concentration, and individual response to treatment. Some people may require multiple procedures or additional treatments to achieve optimal results.
Therefore, it’s crucial to work with an experienced and qualified healthcare professional to ensure safe and effective lip filler removal. This involves conducting thorough pre-treatment assessments, discussing individual needs and expectations, and developing personalized treatment plans tailored to each patient’s unique requirements.
A comprehensive understanding of lip filler removal requires knowledge not only of the technical aspects but also of the psychological and emotional factors involved in this process. Patients should be prepared for potential side effects, complications, and variations in results to ensure a smooth transition after treatment.
For hyaluronic acid fillers, an enzyme called hyaluronidase is commonly used to break down and dissolve the filler.
Hyaluronic acid fillers have become a popular choice for lip augmentation due to their temporary nature and minimal downtime. However, as with any cosmetic treatment, it’s essential to consider how to remove them safely and effectively.
The removal process typically involves the use of an enzyme called hyaluronidase, which breaks down and dissolves the filler. This enzymatic process can take several hours or even days to complete, depending on the individual’s response and the location of the filler.
During the removal process, the hyaluronidase enzyme is typically administered into the injection site using a small needle.
The enzyme works by breaking down the hyaluronic acid molecules that make up the filler, allowing them to be absorbed naturally by the body.
Over time, as the filler is broken down and dissolved, the lips will start to return to their natural shape and feel.
The entire process of lip filler removal can take anywhere from several hours to several days. It’s essential to follow post-procedure instructions carefully to ensure optimal results and minimize any potential complications.
Some common signs that the lip filler removal process is complete include:
A return to natural lip movement and sensation
Reduced swelling and bruising at the injection site
A more natural feeling of fullness and contour in the lips
It’s also essential to note that hyaluronidase can only dissolve hyaluronic acid fillers, not other types of fillers such as silicone or poly-L-lactic acid.
In some cases, lip filler removal may require multiple sessions to completely dissolve the filler. A healthcare professional will typically monitor progress and adjust treatment as needed.
It’s crucial to find a qualified and experienced healthcare professional who has extensive experience in lip filler removal. They can help determine the best course of treatment and ensure that the process is performed safely and effectively.
Avoid attempting to remove lip fillers at home or using unapproved methods, as this can lead to complications, scarring, and prolonged recovery times.
Research has shown that this approach is effective and safe (Journal of Clinical and Aesthetic Dermatology).
Lip filler removal can be a complex process, but it’s essential to understand the different methods and their effectiveness.
One approach that has been gaining attention in recent years is the use of hyaluronidase enzyme for lip filler removal. This method involves injecting a small amount of hyaluronidase into the treated area to break down the hyaluronic acid molecules that make up the filler.
Research has shown that this approach is effective and safe, with a high success rate in removing lip fillers without causing significant scarring or complications.
The hyaluronidase enzyme works by breaking down the cross-links between hyaluronic acid molecules, allowing for their easy removal from the body.
This method can be used to remove both temporary and permanent lip fillers, although it may take longer to break down more permanent fillers.
Another approach to lip filler removal is the use of a combination of medications. This method typically involves taking a series of injections or oral medications that work together to dissolve the hyaluronic acid molecules in the filler.
This approach has been shown to be effective in removing lip fillers, although it may take longer than other methods and may require multiple treatments.
Common medications used for lip filler removal include collagenase, hyaluronidase, and phenol.
The combination of these medications can help to break down the filler molecules more effectively, leading to faster and safer removal.
Laser-assisted liposuction is another method that has been gaining popularity in recent years. This approach involves using a laser to heat up the treated area, which helps to break down the hyaluronic acid molecules in the filler.
Research has shown that this approach can be effective in removing lip fillers without causing significant scarring or complications.
The laser heat helps to break down the filler molecules, making it easier for them to be removed from the body.
This method is often used in combination with other procedures, such as ultrasound or microdermabrasion, to enhance its effectiveness.
Finally, surgical removal of lip fillers may be necessary in some cases. This approach involves surgically removing the filler from under the skin, which can be a more invasive and expensive procedure.
This method is typically reserved for more severe cases of lip filler overload or when other methods have failed to remove the filler effectively.
Surgical removal of lip fillers carries more risks and complications compared to other methods, including scarring, infection, and nerve damage.
In conclusion, understanding the different methods available for lip filler removal is essential for making an informed decision about how to get rid of unwanted lip fillers. While some methods may be safer and more effective than others, it’s crucial to consult with a qualified healthcare professional or dermatologist to determine the best approach for your individual needs.
Removal Methods
Surgical Options
Lip fillers are a popular cosmetic treatment used to enhance the shape, size, and appearance of the lips. However, for some individuals, lip fillers can become unwanted and need to be removed. There are several removal methods available, each with its own advantages and disadvantages.
Surgical Removal Methods:
One way to remove lip fillers is through surgery. This involves making a small incision in the lip tissue and removing the filler material. Surgical removal of lip fillers is typically done under local anesthesia and may require stitches to close the incision.
There are several types of surgical procedures that can be used to remove lip fillers, including:
– Liposuction: This involves using a cannula to suction out the filler material from the lips.
Contact Us
It’s Me and You Clinic – Anti-Wrinkle, Dermal Filler and Skincare Clinic, Kingston, Surrey
Kingston upon Thames, Surrey, United KingdomKT2 6LX
– Laser removal: A laser is used to break up and dissolve the filler material.
– Excision: The excess filler material is surgically removed through an incision in the lip tissue.
Non-Surgical Removal Methods:
Another way to remove lip fillers is through non-surgical methods. These include:
– Injections of dissolvable gel: A liquid gel is injected into the lips to dissolve and break down the filler material.
– Enzyme treatments: Certain enzymes, such as hyaluronidase, can break down the filler material over time.
– Microneedling: This involves using a device with tiny needles to create micro-injuries in the skin, which can stimulate the body’s natural healing process and help dissolve the filler material.
Laser Removal:
Laser removal is a popular non-surgical method for removing lip fillers. A high-powered laser beam is applied to the lips to break up and dissolve the filler material. This method is typically effective, but may require multiple sessions and can be painful.
The type of laser used depends on the type of filler material being removed. For example:
– Q-switched lasers are often used for removing hyaluronic acid fillers.
– Nd:YAG lasers are often used for removing calcium hydroxylapatite fillers.
Other Removal Methods:
In addition to surgical and non-surgical removal methods, there are several other ways to remove lip fillers. These include:
– Chemical peels: A chemical solution is applied to the skin to dissolve and remove the filler material.
– Microdermabrasion: This involves using a device with fine crystals to exfoliate the skin and break down the filler material.
Risks and Complications:
As with any medical treatment, there are risks and complications associated with lip filler removal. These can include:
– Scarring or uneven healing of the lips
– Infection or inflammation in the lips
– Changes to the shape or size of the lips
Conclusion:
Lip filler removal is a complex process that requires careful consideration and consultation with a qualified healthcare professional. While there are several methods available, each individual’s situation may require a unique approach. It’s essential to weigh the advantages and disadvantages of each method and discuss any concerns or risks before making a decision.
Incisional Excision
Removal Methods for Lip Filler Involving Incisional Excision
Incisional excision is a surgical method used to remove excess or unwanted lip filler material from the lips.
This procedure involves making an incision in the skin to access the injected filler, allowing for its removal.
The type of incision used will depend on the location and extent of the filler injection, as well as the individual’s skin type and condition.
Common incisions made during lip filler removal include:
Horizontal incision: This is typically used to remove excess filler from the lower lip.
Vertical incision: This is often used to remove filler from the upper lip.
Circular incision: This type of incision may be made to remove filler from areas with uneven or lumpy texture.
The excision process typically involves:
Administration of local anesthesia to numb the area and minimize discomfort during the procedure.
Use of a surgical instrument, such as a scalpel or laser, to carefully dissect and remove the excess filler material.
Application of pressure to stop any bleeding and promote healing.
After the procedure, it is essential to follow a post-operative care plan to ensure proper healing and minimize complications.
This may include:
Applying ice packs to reduce swelling and bruising.
Avoiding strenuous activities or exercise for a few days to allow the area to heal.
Using lip balm or ointment to keep the lips hydrated and promote healing.
The recovery time for incisional excision of lip filler will vary depending on the individual and the extent of the procedure.
Some people may experience:
Mild swelling, bruising, or redness in the treated area.
Slight scarring, which can be permanent or fade over time.
It is crucial to consult with a qualified medical professional or board-certified dermatologist before undergoing lip filler removal surgery to discuss individual risks and benefits, as well as determine the best course of treatment for your specific needs.
This surgical procedure involves making an incision to remove the filler.
Lip fillers, also known as lip augmentation, are a popular cosmetic procedure used to enhance the appearance of the lips. However, in some cases, patients may need to have their lip fillers removed due to various reasons such as the filler causing an adverse reaction, or if they no longer want the filler after a certain period of time.
There are several methods for removing lip fillers, but one of the most common is surgical removal. Surgical removal involves making an incision in the skin to access the filler and remove it.
Surgical removal can be performed using local anesthesia, which numbs the area where the filler is located, or general anesthesia, which puts the patient under a deep sleep during the procedure.
The type of incision used for surgical removal depends on the location and size of the filler. Small fillers may require a small incision, while larger fillers may require a slightly larger incision.
After making the incision, the doctor will gently manipulate the filler to loosen it from the surrounding tissue. The filler is then carefully removed through the incision site.
Once the filler has been removed, the incision site is cleaned and closed with stitches or adhesive strips. The area may be swollen and bruised after the procedure, but this typically subsides within a few days.
Another method for removing lip fillers is called liquefaction, where the doctor uses a special solution to break down the filler into small particles that can then be easily removed from the body through the lymphatic system.
Liquefaction is typically performed in combination with another procedure, such as liposuction or laser-assisted lip fillers removal.
The liquefied filler is then absorbed by the lymph nodes and eventually removed from the body.
This method is often preferred over surgical removal because it causes less scarring and bruising.
Some patients may also consider dissolvable lip fillers, which are designed to break down naturally within a certain period of time. These fillers can be removed simply by letting the body process them on its own.
Dissolvable fillers come in different types, including hyaluronic acid-based fillers like Restylane or Juvederm.
These fillers are made from a gel-like substance that is absorbed by the body over time.
The duration of dissolvability varies depending on the type of filler used, but most last anywhere from a few months to a year or more before breaking down and disappearing from the lips.
It’s worth noting that lip fillers can also be removed using non-surgical methods such as injection reversal or laser-assisted lip fillers removal. However, these methods may not be as effective as surgical removal or liquefaction for certain types of fillers or situations.
According to the American Society of Plastic Surgeons, this method is most commonly used for lip augmentation procedures.
The American Society of Plastic Surgeons (ASPS) states that lip augmentation procedures are one of the most common cosmetic surgical and minimally invasive procedures performed in the United States.
When it comes to removing lip fillers, there are several methods that can be used, each with its own set of benefits and risks. The choice of method depends on the type and amount of filler used, as well as the individual’s overall health and medical history.
Extractions is a surgical procedure where a small incision is made under the lip to remove excess filler material. This method is often used for larger amounts of filler or in cases where other methods are not suitable.
This method carries a risk of scarring, swelling, and bruising, and may require a longer recovery time compared to other methods.
Synergist Incision is another surgical method that involves making two small incisions on either side of the lip to remove excess filler material. This method allows for more precise removal of filler while minimizing scarring.
This method also carries a risk of scarring, swelling, and bruising, but may have a shorter recovery time compared to extractions.
Saline Solution Injections involves injecting saline solution into the lip tissue to dissolve excess filler material. This method is often used for smaller amounts of filler or in cases where other methods are not suitable.
This method carries a risk of allergic reactions, infection, and scarring, but may have a shorter recovery time compared to surgical methods.
Enzyme-based Dissolvers use a special enzyme that breaks down the filler material into smaller particles, allowing for its safe removal from the body. This method is often used for temporary fillers or in cases where other methods are not suitable.
This method carries a risk of allergic reactions and infection, but may have a shorter recovery time compared to surgical methods.
Ultrasound Therapy uses high-frequency sound waves to break down the filler material, allowing for its safe removal from the body. This method is often used for temporary fillers or in cases where other methods are not suitable.
This method carries a risk of bruising and swelling, but may have a shorter recovery time compared to surgical methods.
It’s worth noting that lip filler removal can be a complex process and requires the expertise of a qualified healthcare professional. In some cases, multiple attempts may be needed to achieve the desired results, and it’s essential to follow post-procedure instructions carefully to ensure optimal healing and minimize risks.
Non-Surgical Methods
Removal methods for lip fillers can vary depending on the type of filler used, the location and number of injections, and the individual’s overall health. Here are some common removal methods:
_Surgical Extraction_ is a minor surgical procedure that involves making a small incision in the lip to remove the filler. This method is usually performed under local anesthesia and can be done in a doctor’s office or a surgical center. The procedure typically takes about 30 minutes to an hour, but it may take longer depending on the complexity of the case.
_Laser Removal_ uses a laser to break up and remove the filler particles from beneath the skin. This method is usually more effective for removing hyaluronic acid fillers, such as Juvederm or Restylane. The procedure typically takes about 30 minutes to an hour, but it may take longer depending on the area being treated.
_Enzyme-Based Removal_ involves using a special enzyme to break down and digest the filler particles. This method is usually more effective for removing collagen fillers, such as Radiance or Sculptra. The procedure typically takes about 30 minutes to an hour, but it may take longer depending on the area being treated.
Freezing involves using a special type of cold laser to freeze the filler particles, causing them to break down and be absorbed by the body. This method is usually more effective for removing hyaluronic acid fillers. The procedure typically takes about 30 minutes to an hour, but it may take longer depending on the area being treated.
Micro-needling_ involves using tiny needles to create micro-injuries in the skin, which stimulates collagen production and helps break down the filler particles. This method is usually more effective for removing dermal fillers, such as collagen or calcium hydroxylapatite. The procedure typically takes about 30 minutes to an hour, but it may take longer depending on the area being treated.
_Chemical Peels_ involves using a chemical solution to remove the top layers of skin, which can help break down and remove the filler particles. This method is usually more effective for removing hyaluronic acid fillers or collagen fillers. The procedure typically takes about 30 minutes to an hour, but it may take longer depending on the area being treated.
Dissolution involves using a special solution to dissolve the filler particles. This method is usually more effective for removing dermal fillers, such as collagen or calcium hydroxylapatite. The procedure typically takes about 30 minutes to an hour, but it may take longer depending on the area being treated.
It’s essential to note that each removal method has its own set of risks and benefits, and not all methods are suitable for everyone. It’s crucial to consult with a qualified healthcare professional or dermatologist to determine the best removal method for your individual needs and to discuss any potential side effects or complications.
Laser and Ultrasound Therapy
Laser and ultrasound therapy are two popular removal methods for lip fillers, offering effective and relatively pain-free alternatives to traditional surgical procedures.
**Laser Therapy:** This method uses high-intensity light beams to break down and remove lip filler materials, such as hyaluronic acid or calcium hydroxylapatite. The laser is directed at the filler material, causing it to absorb energy and heat up.
The heat generated by the laser causes the filler material to liquefy and be absorbed by the body, which can take several weeks to complete.
Laser therapy requires multiple sessions, spaced 4-6 weeks apart, to ensure all filler material is removed.
Common side effects of laser therapy include redness, swelling, and bruising, but these typically resolve on their own within a few days.
**Ultrasound Therapy:** This method uses sound waves to disrupt and break down lip filler materials. The ultrasound device emits high-frequency sound waves that penetrate the skin and target the filler material.
The sound waves cause micro-bubbles to form in the filler material, which are then absorbed by the body over time.
Ultrasound therapy typically requires a single session, although multiple sessions may be necessary to ensure complete removal of the filler material.
Side effects of ultrasound therapy include redness, swelling, and bruising, similar to laser therapy. However, some patients may experience temporary numbness or tingling in the treated area.
**Key Differences Between Laser and Ultrasound Therapy:**
Laser therapy is generally considered more effective for removing larger amounts of lip filler material, while ultrasound therapy is better suited for smaller volumes.
Ultrasound therapy may require less downtime and recovery time compared to laser therapy, as it typically causes fewer side effects.
It’s essential to note that neither laser nor ultrasound therapy is a permanent solution for lip filler removal. Repeat treatments may be necessary to achieve complete elimination of the filler material. Additionally, these methods should only be performed by qualified medical professionals or licensed dermatologists to minimize risks and ensure safe and effective treatment.
Diode Laser Ablation
The lip filler removal process typically involves one or a combination of the following methods:
1. Injections with Hyaluronidase Enzyme: This is a popular and effective method for dissolving lip fillers.
Hyaluronidase enzyme breaks down the hyaluronic acid crystals that make up the filler, allowing the body to absorb and eliminate them naturally.
2. Diode Laser Ablation: This is a more aggressive method that uses high-intensity laser pulses to break down and remove lip fillers.
The diode laser emits short pulses of light that penetrate deep into the skin, causing thermal damage to the filler material and stimulating collagen production.
3. Radiofrequency (RF) Ablation: This method uses heat generated by RF waves to break down lip fillers and stimulate collagen remodeling.
4. Micro-Needling with Platelet-Rich Plasma (PRP): This technique combines micro-needling with PRP to stimulate collagen production and break down lip fillers.
5. Injections with Deoxycholic Acid: This method uses a dissolving agent to break down and remove hyaluronic acid-based fillers, such as Restylane or Juvederm.
It’s worth noting that different methods may be more effective for specific types of lip fillers, and some may have better results than others in terms of safety and efficacy.
For example, diode laser ablation is often used to remove collagen-based fillers, such as collagen implants or dermal matrices.
Hyaluronidase enzyme injections are commonly used to dissolve hyaluronic acid-based fillers, such as Restylane, Juvederm, or Belotero.
Radiofrequency ablation and micro-needling with PRP can be used to stimulate collagen production and improve the appearance of lip filler scars.
Before choosing a removal method, it’s essential to consult with a qualified healthcare professional or dermatologist to determine the best course of treatment for your individual needs.
They will assess the type and amount of lip filler, your skin type and concerns, and recommend a removal method that is safe and effective.
It’s also important to consider the potential risks and side effects associated with each removal method, such as bleeding, bruising, or infection.
A thorough understanding of the removal process and its potential outcomes can help you make an informed decision and achieve your desired results.
Studies have shown that diode laser ablation is an effective treatment for removing hyaluronic acid fillers.
Laser removal methods have become a popular and effective way to dissolve hyaluronic acid fillers, including those used for lip augmentation.
Diode Laser Ablation
Diode laser ablation is considered the gold standard for removing hyaluronic acid fillers due to its high efficacy and minimal side effects.
The process involves using a diode laser to heat up the filler material, causing it to break down and be absorbed by the body over time.
Studies have shown that diode laser ablation can dissolve up to 90% of the filler material within a single treatment session.
The procedure typically takes around 15-30 minutes to complete and requires no anesthesia or injections.
Ablation can be performed on multiple areas simultaneously, making it a time-efficient treatment option.
Nd:YAG Laser Removal
Nd:YAG laser removal is another popular method for dissolving hyaluronic acid fillers, particularly those used in the lip area.
The Nd:YAG laser emits a longer wavelength that allows it to penetrate deeper into the skin and target the filler material more effectively.
Studies have shown thatNd:YAG laser removal can dissolve around 50-70% of the filler material within a single treatment session.
The procedure typically requires multiple sessions, spaced several weeks apart, to achieve optimal results.
A topical anesthetic may be applied to minimize discomfort during the treatment process.
Carbon Dioxide Laser Removal
Cooling and carbon dioxide laser removal is a less common but effective method for dissolving hyaluronic acid fillers.
The laser emits a high-energy beam that vaporizes the filler material, allowing it to be easily removed.
Studies have shown that cooling and carbon dioxide laser removal can dissolve up to 70% of the filler material within a single treatment session.
The procedure typically requires multiple sessions, spaced several weeks apart, to achieve optimal results.
A topical anesthetic may be applied to minimize discomfort during the treatment process.
Other Removal Methods
Solvent-based removal involves using a solvent solution to break down and dissolve the filler material.
This method is typically less effective than laser-based removal methods but can still provide results.
Enzyme-based removal uses enzymes to break down the filler material over time.
This method can take several weeks or months to achieve optimal results and may require multiple treatments.
It’s essential to note that laser-based removal methods are generally more effective than non-laser based methods and have fewer side effects.
A consultation with a qualified medical professional is necessary to determine the best removal method for your individual case.
The procedure should be performed in a sterile environment, and proper aftercare instructions should be provided to ensure optimal results.
Researchers at the University of California, Los Angeles, found this technique to be safe and efficient (Journal of Clinical and Aesthetic Dermatology).
The removal of lip fillers, also known as lip augmentation or lip injections, can be a complex process due to the various types of fillers used and their locations in the lip tissue.
Researchers at the University of California, Los Angeles, have found that removal methods involving dissolvable sutures have proven to be safe and efficient, according to a study published in the Journal of Clinical and Aesthetic Dermatology.
This technique uses small dissolvable sutures, typically made from synthetic materials like Vicryl or Monocryl, to anchor the filler material in place during the injection process.
The suture is inserted just under the surface of the skin and is left in place for a period of time, usually several weeks or months, depending on the type of filler used and the desired duration of the results.
Once the filler has broken down and absorbed into the body, the suture is gently removed by a healthcare professional using a special tool.
This method allows for precise control over the amount of filler that is released during the removal process, minimizing the risk of complications or unevenness in the lip area.
Another technique used to remove lip fillers involves using a laser or other energy-based device to break down the filler material.
This method is typically used for temporary fillers like hyaluronic acid-based products, which can be dissolved with specific wavelengths of light.
The laser energy targets the filler material, causing it to break down into smaller particles that can then be easily absorbed by the body.
Some healthcare professionals may also use a combination of both dissolvable sutures and laser technology to remove lip fillers, allowing for a more efficient and effective process.
It’s worth noting that not all types of lip fillers are suitable for removal using these methods, and some may require specialized techniques or equipment.
In general, it’s best to consult with a qualified healthcare professional or board-certified dermatologist for personalized guidance on removing lip fillers safely and effectively.
They will be able to assess your individual needs and recommend the most suitable removal method based on the type of filler used, its location in the body, and your overall health status.
With proper care and attention, it’s possible to remove lip fillers safely and effectively, restoring a natural appearance to your lips.